创建玩家场景
项目设置到位后,我们可以开始处理玩家控制的角色。
第一个场景,我们会定义 Player 对象。 单独创建Player场景的好处之一是,在游戏的其他部分做出来之前,我们就可以对其进行单独测试。
节点结构
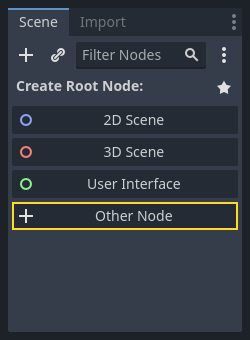
To begin, we need to choose a root node for the player object. As a general rule, a scene's root node should reflect the object's desired functionality - what the object is. In the upper-left corner, in the "Scene" tab, click the "Other Node" button and add an Area2D node to the scene.
When you add the Area2D node, Godot will display the following warning icon
next to it in the scene tree:

This warning tells us that the Area2D node requires a shape to detect collisions or overlaps.
We can ignore the warning temporarily because we will first set up the player's visuals
(using an animated sprite). Once the visuals are ready, we will add a collision shape as a child
node. This will allow us to accurately size and position the shape based on the sprite's appearance.
使用 Area2D 可以检测到与玩家重叠或进入玩家内的物体。 通过双击节点名称将其名称更改为 Player。 我们已经设置好了场景的根节点,现在可以向该角色中添加其他节点来增加功能。
在将任何子节点添加到 Player 节点之前,我们要确保不会通过点击它们来意外移动它们或调整它们的大小。选择该节点并单击锁右侧的图标。其工具提示显示“将所选节点与其子节点组合。这样在 2D 和 3D 视图中点击子节点就会选中父节点。”

Save the scene as player.tscn. Click Scene > Save, or press Ctrl + S
on Windows/Linux or Cmd + S on macOS.
备注
对于此项目,我们将遵循 Godot 的命名约定。
GDScript:类(节点)使用 PascalCase(大驼峰命名法),变量和函数使用 snake_case(蛇形命名法),常量使用 ALL_CAPS(全大写)(请参阅 GDScript 编写风格指南)。
C#:类、导出变量和方法使用 PascalCase(大驼峰命名法),私有字段使用 _camelCase(前缀下划线的小驼峰命名法),局部变量和参数使用 camelCase(小驼峰命名法)(请参阅 C# 风格指南)。连接信号时,请务必准确键入方法名称。
精灵动画
Click on the Player node and add (Ctrl + A on Windows/Linux or
Cmd + A on macOS) a child node AnimatedSprite2D. The AnimatedSprite2D will handle the
appearance and animations for our player. Notice that there is a warning symbol
next to the node. An AnimatedSprite2D requires a SpriteFrames resource, which is a list of the animations it can
display. Make sure AnimatedSprite2D is selected and then find the Sprite Frames property under
the Animation section in the Inspector and click "[empty]" -> "New SpriteFrames":
Click on the SpriteFrames you just created to open the "SpriteFrames" panel:
On the left is a list of animations. Click the default one and rename it to
walk. Then click the Add Animation button to create a second animation
named up.
Find the player images in the FileSystem dock - they're in the art folder
you unzipped earlier. Drag the two images for each animation, into the
Animation Frames side of the panel for the corresponding animation:
playerGrey_walk1andplayerGrey_walk2for thewalkanimationplayerGrey_up1andplayerGrey_up2for theupanimation
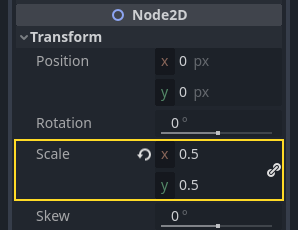
玩家图像对于游戏窗口来说有点过大,需要缩小它们。点击 AnimatedSprite2D 节点,可以在检查器 Node2D 标签中,将 Scale 属性设置为 (0.5, 0.5)。
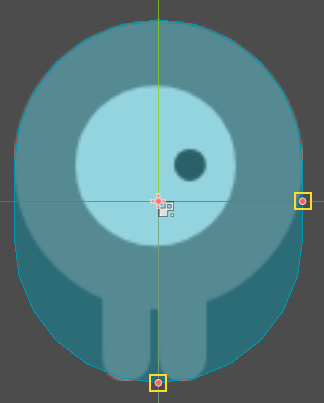
最后,在 Player 下添加一个 CollisionShape2D 作为子节点,以确定玩家的“攻击框”,或者说碰撞范围。CapsuleShape2D 节点最适合这个角色,那么就在检查器中“Shape”的旁边点击“[空]”->“新建 CapsuleShape2D”添加形状,使用两个控制柄,调整形状大小以覆盖精灵:
完成后,你的 Player 场景看起来应该像这样:
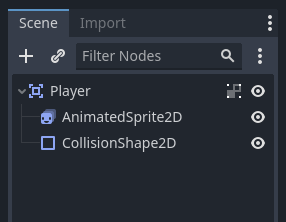
Once this is done, the warning on the Area2D node will disappear, as it now has
a shape assigned and can interact with other objects.
修改完成后请确保再次保存场景。
在下一部分中,我们将向玩家节点添加一个脚本,以移动它并为其添加动画效果。然后,我们将设置碰撞检测,以了解玩家何时被某些东西击中。