游戏信息显示
我们的游戏最后还需要用户界面(User Interface,UI),显示分数、“游戏结束”信息、重启按钮。
创建新场景,点击“其他节点”按钮,然后添加一个 CanvasLayer 节点并命名为 HUD。“HUD”是“heads-up display”(游戏信息显示)的缩写,是覆盖在游戏视图上显示的信息。
CanvasLayer 节点可以让我们在游戏的其他部分的上一层绘制 UI 元素,这样它所显示的信息就不会被任何游戏元素(如玩家或敌人)所覆盖。
HUD 中需要显示以下信息:
得分,由
ScoreTimer更改。消息,例如“Game Over”或“Get Ready!”
“Start”按钮来开始游戏。
UI 元素的基本节点是 Control。要创建 UI,我们需使用 Control 下的两种节点:Label 和 Button。
创建以下节点作为 HUD 的子节点:
名为分数标签
ScoreLabel的 Label。名为消息
Message的 Label。名为开始按钮
StartButton的 Button。名为信息计数器
MessageTimer的 Timer。
点击 ScoreLabel 并在“检查器”的 Text 字段中键入一个数字。Control 节点的默认字体很小,不能很好地缩放。游戏资产包中有一个叫作“Xolonium-Regular.ttf”的字体文件。 使用此字体需要执行以下操作:
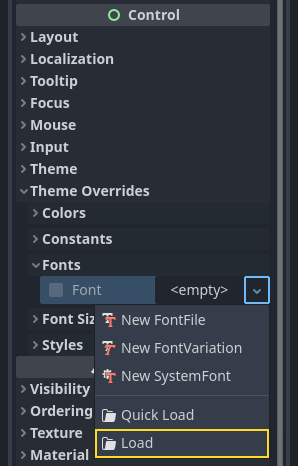
在“Theme Overrides > Fonts”(主题覆盖 > 字体)中选择“加载”,然后选中“Xolonium-Regular.ttf”文件。
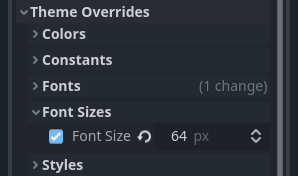
字体尺寸仍然太小,请在“Theme Overrides > Font Sizes”(主题覆盖 > 字体大小)下将其增加到 64。当 ScoreLabel 完成此操作后,请重复对 Message 和 StartButton 节点做同样的修改。
备注
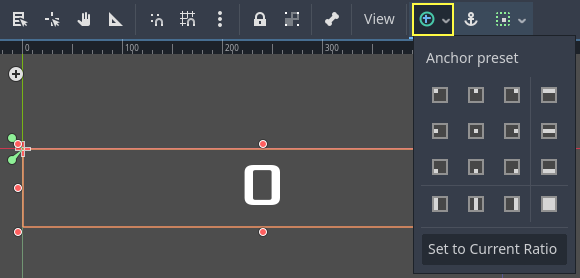
锚点:Control 节点具有位置和大小,但它也有锚点(Anchor)。锚点定义的是原点——节点边缘的参考点。
请将节点如下图排列。拖动节点可以手动放置,也可以使用“锚点预设(Anchor Preset)”进行更精确的定位。
ScoreLabel
添加文本
0。将“Horizontal Alignment”和“Vertical Alignment”设置为
Center。为“Anchor Preset”选择
Center Top。
Message
添加文本
Dodge the Creeps!。将“Horizontal Alignment”和“Vertical Alignment”设置为
Center。将“Autowrap Mode”设置为
Word,否则标签只会有一行。在“Control - Layout/Transform”中将“Size X”设置为
480,使用屏幕的完整宽度。为“Anchor Preset”选择
Center。
将 HUD 场景连接到 Main 场景
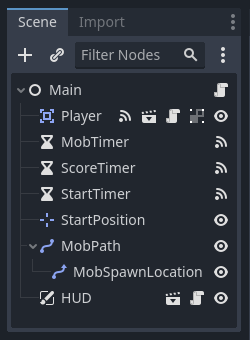
现在我们完成了 HUD 场景,保存并返回 Main 场景。和 Player 场景的做法一样,在 Main 场景中实例化 HUD 场景。如果你没有错过任何东西,完整的场景树应该像这样:
现在我们需要将 HUD 功能与我们的 Main 脚本连接起来。这需要在 Main 场景中添加一些内容:
在“节点”选项卡中,点击“连接信号”窗口中的“选取”按钮,选择 new_game() 方法或在窗口的“接收方法”下面输入“new_game”,将 HUD 的 start_game 信号连接到 Main 节点的 new_game() 函数。请确认脚本中 func new_game() 的旁边出现了一个绿色的连接图标。
在 new_game() 函数中,更新分数显示并显示“Get Ready”消息:
$HUD.update_score(score)
$HUD.show_message("Get Ready")
var hud = GetNode<HUD>("HUD");
hud.UpdateScore(_score);
hud.ShowMessage("Get Ready!");
在 game_over() 中我们需要调用相应的 HUD 函数:
$HUD.show_game_over()
GetNode<HUD>("HUD").ShowGameOver();
最后,将下面的代码添加到 _on_score_timer_timeout() 中,保持不断变化的分数的同步显示:
$HUD.update_score(score)
GetNode<HUD>("HUD").UpdateScore(_score);
警告
如果还没做的话,请不要忘记在 _ready() 中移除对 new_game() 的调用。否则你的游戏将自动开始。
Now you're ready to play! Click the "Play the Project" button.
删除旧的小怪
如果你一直玩到“游戏结束”,然后重新开始新游戏,上局游戏的小怪仍然显示在屏幕上。更好的做法是在新游戏开始时清除它们。我们需要一个同时让所有小怪删除它自己的方法,为此可以使用“分组”功能。
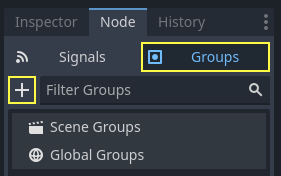
In the Mob scene, select the root node and click the "Node" tab next to the
Inspector (the same place where you find the node's signals). Next to "Signals",
click "Groups" to open the group overview
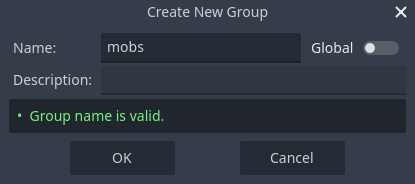
and the "+" button to open the "Create New Group" dialog.
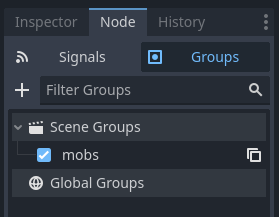
Name the group mobs and click "ok" to add a new scene group.
Now all mobs will be in the "mobs" group.
We can then add the following line to the new_game() function in Main:
get_tree().call_group("mobs", "queue_free")
// Note that for calling Godot-provided methods with strings,
// we have to use the original Godot snake_case name.
GetTree().CallGroup("mobs", Node.MethodName.QueueFree);
call_group() 函数调用组中每个节点上的删除函数——让每个怪物删除其自身。
游戏在这一点上大部分已经完成。在下一部分和最后一部分中,我们将通过添加背景,循环音乐和一些键盘快捷键来对其进行一些润色。