制作插件
关于插件
插件是用有用的工具来扩展编辑器的一个好方法. 它可以完全用GDScript和标准场景制作, 甚至不需要重新加载编辑器. 与模块不同, 你不需要创建C++代码也不需要重新编译引擎. 虽然这使得插件的功能不那么强大, 但你仍然可以用它们做很多事情. 请注意, 一个插件与你已经可以制作的任何场景相似, 只是它是用脚本创建的, 以增加编辑器功能.
本教程将指导你创建两个插件,以便你了解它们的工作原理并能够开发自己的插件。第一个是可以添加到项目中的任何场景的自定义节点,另一个是添加到编辑器的自定义停靠面板。
创建插件
在开始前, 先找个地方创建个空项目. 这个空项目是制作和测试我们插件的基础.
编辑器要识别一个新的插件, 首先需要创建两个文件: 一个是 plugin.cfg 用于配置和具有此功能的工具脚本. 插件在项目文件夹里面有一个标准路径, 比如 addons/plugin_name.Godot提供了一个属性框, 用于生成这些文件并将它们放在需要的位置.
在主工具栏中,点击项目下拉菜单,然后点击项目设置...。然后转到插件选项卡,点击右上角的创建新插件按钮。
你会看到出现了一个对话框,类似这样:
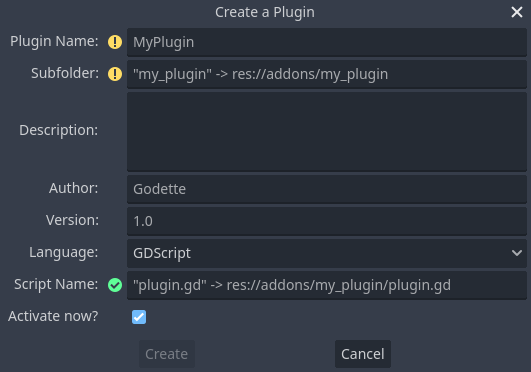
每个字段中文本属性都描述了它会影响到哪些配置文件的值.
如果要继续使用该例子,请使用下列的值:
Plugin Name: My Custom Node
Subfolder: my_custom_node
Description: A custom node made to extend the Godot Engine.
Author: Your Name Here
Version: 1.0.0
Language: GDScript
Script Name: custom_node.gd
Activate now: No
Plugin Name: My Custom Node
Subfolder: MyCustomNode
Description: A custom node made to extend the Godot Engine.
Author: Your Name Here
Version: 1.0.0
Language: C#
Script Name: CustomNode.cs
Activate now: No
警告
始终需要在 C# 中去掉对 立即激活? 选项的勾选,因为和其他 C# 脚本一样,EditorPlugin 脚本是需要编译的,要求构建整个项目。构建项目后,就可以在 项目设置 的 插件 选项卡中启用该插件。
你最终应该得到这样的目录结构:

plugin.cfg 是一个包含插件元数据的 INI 文件。名称和描述可帮助人们了解插件的作用。你的名字有助于你获得适当的工作认可。版本号可帮助其他人了解他们是否拥有过时的版本;如果你不确定如何得出版本号,请查看语义版本控制。脚本文件将指示 Godot 插件在激活后在编辑器中执行的操作。
脚本文件
创建插件后,对话框将自动为你打开 EditorPlugin 脚本。该脚本有两个你无法更改的要求:它必须是一个 @tool 脚本,否则它将无法在编辑器中正确加载,并且它必须从 EditorPlugin 继承。
警告
除了 EditorPlugin 脚本之外,插件用到的其他 GDScript 也必须是工具脚本。编辑器使用的任何没有 @tool 的 GDScript 都会像一个空文件一样!
处理资源的初始化和清理非常重要。一个好的做法是使用虚函数 _enter_tree() 来初始化插件,并使用 _exit_tree() 来清理插件。幸运的是,对话框会为你生成这些回调。你的脚本应该看起来像这样:
@tool
extends EditorPlugin


func _enter_tree():
    # Initialization of the plugin goes here.
    pass


func _exit_tree():
    # Clean-up of the plugin goes here.
    pass
#if TOOLS
using Godot;

[Tool]
public partial class CustomNode : EditorPlugin
{
    public override void _EnterTree()
    {
        // Initialization of the plugin goes here.
    }

    public override void _ExitTree()
    {
        // Clean-up of the plugin goes here.
    }
}
#endif
这是创建新插件时使用的好模板.
自定义节点
有时你希望在许多节点中存在某种行为, 例如可以重复使用的自定义场景或控件. 实例化在很多情况下都很有用, 但有时它会很麻烦, 特别是如果你在许多项目中使用它. 一个很好的解决方案是创建一个插件, 添加一个具有自定义行为的节点.
警告
通过 EditorPlugin 添加的节点是“CustomType”(自定义类型)节点。虽然它们可以用于任何脚本语言,但功能比 Script 类系统少。如果你正在编写 GDScript 或 NativeScript,建议使用 Script 类代替。
要创建一个新的节点类型,你可以使用 EditorPlugin 类中的函数 add_custom_type()。该函数可以向编辑器添加新类型(节点或资源)。但是,在创建类型之前,你需要一个脚本作为该类型的逻辑。虽然该脚本不必使用 @tool 注解,但可以添加它以便脚本在编辑器中运行。
在本教程中,我们将创建一个按钮,当点击时会打印一条消息。为此,我们需要一个从 Button 扩展的脚本。如果你愿意,它也可以扩展 BaseButton:
@tool
extends Button


func _enter_tree():
    pressed.connect(clicked)


func clicked():
    print("You clicked me!")
using Godot;

[Tool]
public partial class MyButton : Button
{
    public override void _EnterTree()
    {
        Pressed += Clicked;
    }

    public void Clicked()
    {
        GD.Print("You clicked me!");
    }
}
这就是我们的基本按钮。你可以在插件文件夹中将其保存为 my_button.gd。你还需要一个 16×16 图标来显示在场景树中。如果你没有,你可以从引擎中获取默认图标,并将其保存在 addons/my_custom_node 文件夹中作为 icon.png,或者使用默认的 Godot 徽标(preload("res://icon.svg"))。
小技巧
SVG images that are used as custom node icons should have the Editor > Scale With Editor Scale and Editor > Convert Colors With Editor Theme import options enabled. This allows icons to follow the editor's scale and theming settings if the icons are designed with the same color palette as Godot's own icons.
现在,我们需要把它作为一个自定义类型添加,以便它显示在新建 Node 的对话框中。为此,将 custom_node.gd 脚本改为以下内容:
@tool
extends EditorPlugin


func _enter_tree():
    # Initialization of the plugin goes here.
    # Add the new type with a name, a parent type, a script and an icon.
    add_custom_type("MyButton", "Button", preload("my_button.gd"), preload("icon.png"))


func _exit_tree():
    # Clean-up of the plugin goes here.
    # Always remember to remove it from the engine when deactivated.
    remove_custom_type("MyButton")
#if TOOLS
using Godot;

[Tool]
public partial class CustomNode : EditorPlugin
{
    public override void _EnterTree()
    {
        // Initialization of the plugin goes here.
        // Add the new type with a name, a parent type, a script and an icon.
        var script = GD.Load<Script>("res://addons/MyCustomNode/MyButton.cs");
        var texture = GD.Load<Texture2D>("res://addons/MyCustomNode/Icon.png");
        AddCustomType("MyButton", "Button", script, texture);
    }

    public override void _ExitTree()
    {
        // Clean-up of the plugin goes here.
        // Always remember to remove it from the engine when deactivated.
        RemoveCustomType("MyButton");
    }
}
#endif
完成后, 插件应该已经在 项目设置 的插件列表中可用, 因此请按照 Checking the results 中的说明激活它.
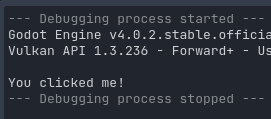
然后通过添加新节点来尝试:
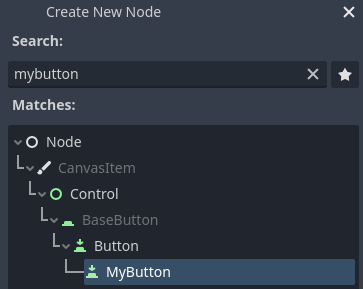
当你添加节点时, 你可以看到它已经有你创建的脚本附加在上面. 给这个按钮设置一个文本, 保存并运行场景. 当你点击按钮时, 你可以在控制台中看到一些文字:
自定义窗口
有时, 你需要扩展编辑器并添加始终可用的工具. 一种简单的方法是添加一个带插件的新扩展面板. Docks只是基于Control的场景, 因此它们的创建方式与通常的GUI场景类似.
创建一个自定义栏好的方法和自定义节点一样. 在 addons/my_custom_dock 文件夹中创建一个新的 plugin.cfg 文件, 然后在其中添加以下内容:
[plugin]

name="My Custom Dock"
description="A custom dock made so I can learn how to make plugins."
author="Your Name Here"
version="1.0"
script="custom_dock.gd"
[plugin]

name="My Custom Dock"
description="A custom dock made so I can learn how to make plugins."
author="Your Name Here"
version="1.0"
script="CustomDock.cs"
然后在同一文件夹中创建脚本 custom_dock.gd。填写之前见过的模板以获得良好的开端。
由于我们正在尝试添加新的自定义窗口, 因此我们需要创建窗口的内容. 这只不过是一个标准的Godot场景: 只需在编辑器中创建一个新场景然后编辑它.
对于编辑器停靠站, 根节点 必须是 Control 或其子类之一. 在本教程中, 你可以创建一个按钮. 根节点的名称也将是面板对话框中显示的名称, 因此请务必为其指定一个简短的描述性名称. 另外, 不要忘记在按钮上添加一些文字.
把这个场景保存为 my_dock.tscn . 现在, 我们需要抓取我们创建的场景, 然后在编辑器中把它添加为一个栏目. 为此, 你可以依赖 add_control_to_dock() 这个函数, 它来自 EditorPlugin 类.
你需要选择一个停靠位置并定义要添加的控件, 也就是你刚刚创建的场景. 不要忘了在插件停用时 remove the dock . 脚本可以是这样的:
@tool
extends EditorPlugin


# A class member to hold the dock during the plugin life cycle.
var dock


func _enter_tree():
    # Initialization of the plugin goes here.
    # Load the dock scene and instantiate it.
    dock = preload("res://addons/my_custom_dock/my_dock.tscn").instantiate()

    # Add the loaded scene to the docks.
    add_control_to_dock(DOCK_SLOT_LEFT_UL, dock)
    # Note that LEFT_UL means the left of the editor, upper-left dock.


func _exit_tree():
    # Clean-up of the plugin goes here.
    # Remove the dock.
    remove_control_from_docks(dock)
    # Erase the control from the memory.
    dock.free()
#if TOOLS
using Godot;

[Tool]
public partial class CustomDock : EditorPlugin
{
    private Control _dock;

    public override void _EnterTree()
    {
        _dock = GD.Load<PackedScene>("res://addons/MyCustomDock/MyDock.tscn").Instantiate<Control>();
        AddControlToDock(DockSlot.LeftUl, _dock);
    }

    public override void _ExitTree()
    {
        // Clean-up of the plugin goes here.
        // Remove the dock.
        RemoveControlFromDocks(_dock);
        // Erase the control from the memory.
        _dock.Free();
    }
}
#endif
请注意, 虽然Dock最初会出现在其指定的位置, 但用户可以自由改变其位置, 并保存所产生的布局.
检查结果
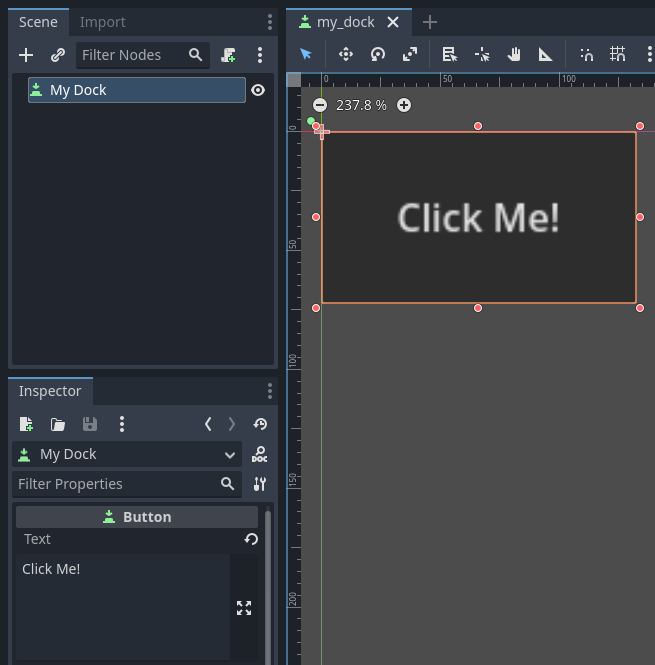
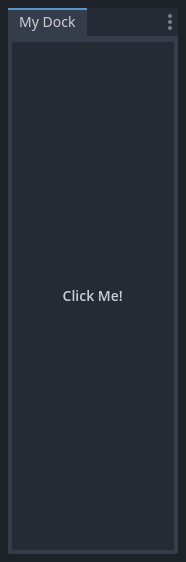
现在是时候检查工作成果了。打开项目设置并点击插件选项卡。你的插件应该是列表中唯一的插件。

你可以看到该插件未启用。点击启用勾选框以激活该插件。在关闭设置窗口之前,该停靠面板应该已经可见。你现在应该有一个自定义的停靠面板了:
在插件中注册自动加载/单例
编辑器插件可以在启用时自动注册自动加载。同样也包含了在插件禁用时反注册该自动加载。
这样用户就可以更快速地设置插件了,因为你的编辑器插件要求使用自动加载时,他们不必再手动去项目设置里添加自动加载了。
在编辑器插件中使用以下代码注册单例:
@tool
extends EditorPlugin

# Replace this value with a PascalCase autoload name, as per the GDScript style guide.
const AUTOLOAD_NAME = "SomeAutoload"


func _enable_plugin():
    # The autoload can be a scene or script file.
    add_autoload_singleton(AUTOLOAD_NAME, "res://addons/my_addon/some_autoload.tscn")


func _disable_plugin():
    remove_autoload_singleton(AUTOLOAD_NAME)
#if TOOLS
using Godot;

[Tool]
public partial class MyEditorPlugin : EditorPlugin
{
    // Replace this value with a PascalCase autoload name.
    private const string AutoloadName = "SomeAutoload";

    public override void _EnablePlugin()
    {
        // The autoload can be a scene or script file.
        AddAutoloadSingleton(AutoloadName, "res://addons/MyAddon/SomeAutoload.tscn");
    }

    public override void _DisablePlugin()
    {
        RemoveAutoloadSingleton(AutoloadName);
    }
}
#endif
Using sub-plugins
Often a plugin adds multiple things, for example a custom node and a panel. In those cases it might be easier to have a separate plugin script for each of those features. Sub-plugins can be used for this.
First create all plugins and sub plugins as normal plugins:
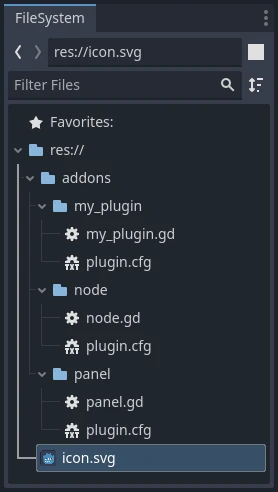
Then move the sub plugins into the main plugin folder:

Godot will hide sub-plugins from the plugin list, so that a user can't enable or disable them. Instead the main plugin script should enable and disable sub-plugins like this:
@tool
extends EditorPlugin

# The main plugin is located at res://addons/my_plugin/
const PLUGIN_NAME = "my_plugin"

func _enable_plugin():
    EditorInterface.set_plugin_enabled(PLUGIN_NAME + "/node", true)
    EditorInterface.set_plugin_enabled(PLUGIN_NAME + "/panel", true)

func _disable_plugin():
    EditorInterface.set_plugin_enabled(PLUGIN_NAME + "/node", false)
    EditorInterface.set_plugin_enabled(PLUGIN_NAME + "/panel", false)
举一反三
现在你已经学会了如何制作基本插件, 你可以通过多种方式扩展编辑器. 可以使用GDScript将许多功能添加到编辑器中; 它是一种创建专业编辑器的强大方法, 无需深入研究C++模块.
你可以制作自己的插件来帮助自己或在 资产库 中分享它们,以便人们可以从你的工作中受益。