自定义后期处理
前言
Godot provides many post-processing effects out of the box, including Bloom, DOF, and SSAO, which are described in 环境和后期处理. However, advanced use cases may require custom effects. This article explains how to write your own custom effects.
实现自定义后期处理着色器的最简单方法是使用Godot的内置功能从屏幕纹理中读取. 如果你不熟悉这个, 你应该先阅读 屏幕阅读着色器教程 .
单阶段后期处理
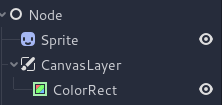
Post-processing effects are shaders applied to a frame after Godot has rendered
it. To apply a shader to a frame, create a CanvasLayer, and give it a ColorRect. Assign a
new ShaderMaterial to the newly created
ColorRect, and set the ColorRect's anchor preset to Full Rect:

Setting the anchor preset to Full Rect on the ColorRect node
你的场景树应该类似这样:
备注
Another more efficient method is to use a BackBufferCopy to copy a region of the screen to a buffer and to
access it in a shader script through a sampler2D using
hint_screen_texture.
备注
As of the time of writing, Godot does not support rendering to multiple buffers at the same time. Your post-processing shader will not have access to other render passes and buffers not exposed by Godot (such as depth or normal/roughness). You only have access to the rendered frame and buffers exposed by Godot as samplers.
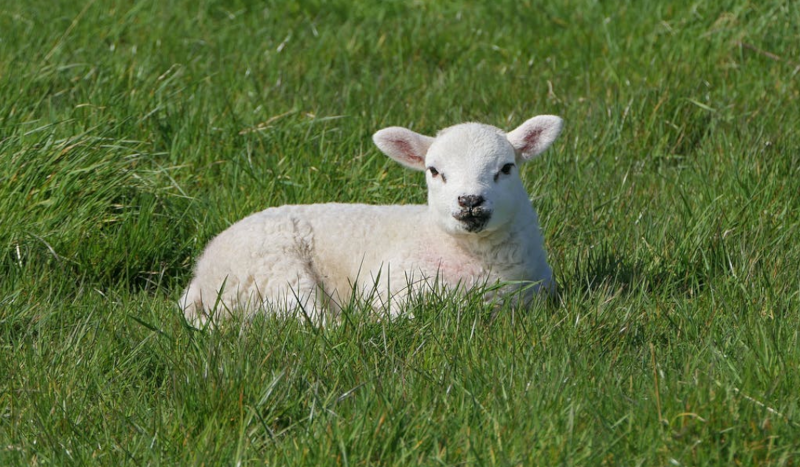
这个演示中,我们使用的是这张小羊的精灵。
Assign a new Shader to the ColorRect's
ShaderMaterial. You can access the frame's texture and UV with a
sampler2D using hint_screen_texture and the built-in SCREEN_UV
uniforms.
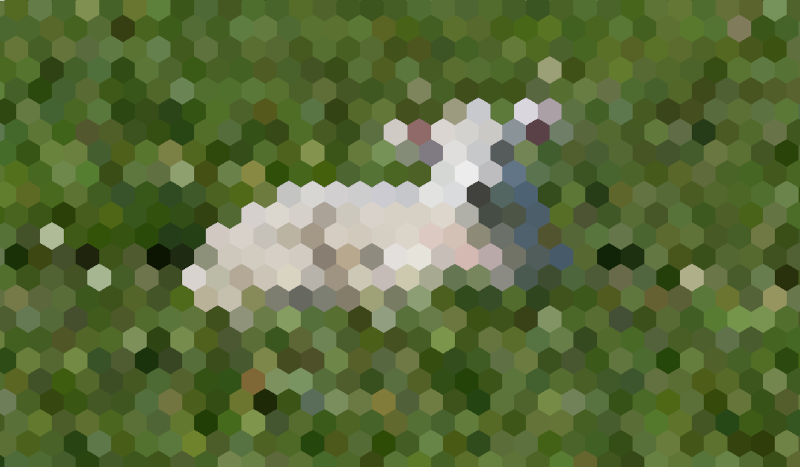
将以下代码复制到着色器. 上面的代码是单通道边缘检测滤波器, Sobel 滤波器 ,
shader_type canvas_item;

uniform vec2 size = vec2(32.0, 28.0);
// If you intend to read from mipmaps with `textureLod()` LOD values greater than `0.0`,
// use `filter_nearest_mipmap` instead. This shader doesn't require it.
uniform sampler2D screen_texture : hint_screen_texture, repeat_disable, filter_nearest;

void fragment() {
        vec2 norm_size = size * SCREEN_PIXEL_SIZE;
        bool less_than_half = mod(SCREEN_UV.y / 2.0, norm_size.y) / norm_size.y < 0.5;
        vec2 uv = SCREEN_UV + vec2(norm_size.x * 0.5 * float(less_than_half), 0.0);
        vec2 center_uv = floor(uv / norm_size) * norm_size;
        vec2 norm_uv = mod(uv, norm_size) / norm_size;
        center_uv += mix(vec2(0.0, 0.0),
                         mix(mix(vec2(norm_size.x, -norm_size.y),
                                 vec2(0.0, -norm_size.y),
                                 float(norm_uv.x < 0.5)),
                             mix(vec2(0.0, -norm_size.y),
                                 vec2(-norm_size.x, -norm_size.y),
                                 float(norm_uv.x < 0.5)),
                             float(less_than_half)),
                         float(norm_uv.y < 0.3333333) * float(norm_uv.y / 0.3333333 < (abs(norm_uv.x - 0.5) * 2.0)));

        COLOR = textureLod(screen_texture, center_uv, 0.0);
}
小羊就会变成这样:
多阶段后期处理
模糊之类的后期处理效果属于资源密集型效果,将其拆分为多个阶段就可以大幅提升运行速度。在多阶段材质中,每个阶段都会使用上一阶段的结果作为输入,从而进行处理。
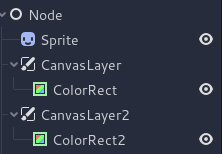
To produce a multi-pass post-processing shader, you stack CanvasLayer and
ColorRect nodes. In the example above, you use a CanvasLayer object to
render a shader using the frame on the layer below. Apart from the node
structure, the steps are the same as with the single-pass post-processing
shader.
你的场景树应该类似这样:
例如,可以通过将下面的代码段附加到每个 ColorRect 上来编写全屏高斯模糊效果。应用着色器的顺序取决于场景树中 CanvasLayer 的位置,越往上越早应用。对于这个模糊着色器而言,顺序是无所谓的。
shader_type canvas_item;

uniform sampler2D screen_texture : hint_screen_texture, repeat_disable, filter_nearest;

// Blurs the screen in the X-direction.
void fragment() {
    vec3 col = texture(screen_texture, SCREEN_UV).xyz * 0.16;
    col += texture(screen_texture, SCREEN_UV + vec2(SCREEN_PIXEL_SIZE.x, 0.0)).xyz * 0.15;
    col += texture(screen_texture, SCREEN_UV + vec2(-SCREEN_PIXEL_SIZE.x, 0.0)).xyz * 0.15;
    col += texture(screen_texture, SCREEN_UV + vec2(2.0 * SCREEN_PIXEL_SIZE.x, 0.0)).xyz * 0.12;
    col += texture(screen_texture, SCREEN_UV + vec2(2.0 * -SCREEN_PIXEL_SIZE.x, 0.0)).xyz * 0.12;
    col += texture(screen_texture, SCREEN_UV + vec2(3.0 * SCREEN_PIXEL_SIZE.x, 0.0)).xyz * 0.09;
    col += texture(screen_texture, SCREEN_UV + vec2(3.0 * -SCREEN_PIXEL_SIZE.x, 0.0)).xyz * 0.09;
    col += texture(screen_texture, SCREEN_UV + vec2(4.0 * SCREEN_PIXEL_SIZE.x, 0.0)).xyz * 0.05;
    col += texture(screen_texture, SCREEN_UV + vec2(4.0 * -SCREEN_PIXEL_SIZE.x, 0.0)).xyz * 0.05;
    COLOR.xyz = col;
}
shader_type canvas_item;

uniform sampler2D screen_texture : hint_screen_texture, repeat_disable, filter_nearest;

// Blurs the screen in the Y-direction.
void fragment() {
    vec3 col = texture(screen_texture, SCREEN_UV).xyz * 0.16;
    col += texture(screen_texture, SCREEN_UV + vec2(0.0, SCREEN_PIXEL_SIZE.y)).xyz * 0.15;
    col += texture(screen_texture, SCREEN_UV + vec2(0.0, -SCREEN_PIXEL_SIZE.y)).xyz * 0.15;
    col += texture(screen_texture, SCREEN_UV + vec2(0.0, 2.0 * SCREEN_PIXEL_SIZE.y)).xyz * 0.12;
    col += texture(screen_texture, SCREEN_UV + vec2(0.0, 2.0 * -SCREEN_PIXEL_SIZE.y)).xyz * 0.12;
    col += texture(screen_texture, SCREEN_UV + vec2(0.0, 3.0 * SCREEN_PIXEL_SIZE.y)).xyz * 0.09;
    col += texture(screen_texture, SCREEN_UV + vec2(0.0, 3.0 * -SCREEN_PIXEL_SIZE.y)).xyz * 0.09;
    col += texture(screen_texture, SCREEN_UV + vec2(0.0, 4.0 * SCREEN_PIXEL_SIZE.y)).xyz * 0.05;
    col += texture(screen_texture, SCREEN_UV + vec2(0.0, 4.0 * -SCREEN_PIXEL_SIZE.y)).xyz * 0.05;
    COLOR.xyz = col;
}
使用上面的代码, 你应该得到如下所示的全屏模糊效果.
