着色语言
前言
Godot 使用类似于 GLSL ES 3.0 的着色语言。支持大多数数据类型和函数,并且可能会随着时间的推移添加剩余的几种类型和函数。
如果你已经熟悉 GLSL,Godot 着色器迁移指南是一个帮助你从常规 GLSL 转换到 Godot 着色语言的资源。
数据类型
支持大多数 GLSL ES 3.0 数据类型:
类型 |
描述 |
|---|---|
void |
Void 数据类型,只对不返回任何内容的函数有用。 |
bool |
布尔数据类型,只能包含 |
bvec2 |
布尔的两分量向量。 |
bvec3 |
布尔的三分量向量。 |
bvec4 |
布尔的四分量向量。 |
int |
32 bit signed scalar integer. |
ivec2 |
有符号整数的双分量向量。 |
ivec3 |
有符号整数的三分量向量。 |
ivec4 |
有符号整数的四分量向量。 |
uint |
无符号标量整数;不能包含负数。 |
uvec2 |
无符号整数的两分量向量。 |
uvec3 |
无符号整数的三分量向量。 |
uvec4 |
无符号整数的四分量向量。 |
float |
32 bit floating-point scalar. |
vec2 |
浮点值的两分量向量。 |
vec3 |
浮点值的三分量向量。 |
vec4 |
浮点值的四分量向量。 |
mat2 |
2x2 矩阵,按列主要顺序。 |
mat3 |
3x3 矩阵,按列主要顺序。 |
mat4 |
4x4 矩阵,按列主要顺序。 |
sampler2D |
用于绑定被读取为浮点数的 2D 纹理的采样器类型。 |
isampler2D |
用于绑定被读取为有符号整数的 2D 纹理的采样器类型。 |
usampler2D |
用于绑定被读取为无符号整数的 2D 纹理的采样器类型。 |
sampler2DArray |
用于绑定被读取为浮点数的 2D 纹理数组的采样器类型。 |
isampler2DArray |
用于绑定被读取为有符号整数的 2D 纹理数组的采样器类型。 |
usampler2DArray |
用于绑定被读取为无符号整数的 2D 纹理数组的采样器类型。 |
sampler3D |
用于绑定被读取为浮点数的 3D 纹理的采样器类型。 |
isampler3D |
用于绑定被读取为有符号整数的 3D 纹理的采样器类型。 |
usampler3D |
用于绑定被读取为无符号整数的 3D 纹理的采样器类型。 |
samplerCube |
用于绑定被读取为浮点数的立方体贴图的采样器类型。 |
samplerCubeArray |
Sampler type for binding Cubemap arrays, which are read as float. Only supported in Forward+ and Mobile, not Compatibility. |
samplerExternalOES |
External sampler type. Only supported in Compatibility/Android platform. |
警告
Local variables are not initialized to a default value such as 0.0. If
you use a variable without assigning it first, it will contain whatever
value was already present at that memory location, and unpredictable visual
glitches will appear. However, uniforms and varyings are initialized to a
default value.
类型转换
与 GLSL ES 3.0 一样,不允许在大小相同但类型不同的标量和向量之间进行隐式转换。也不允许强制转换不同大小的类型。转换必须通过构造函数显式完成。
示例:
float a = 2; // invalid
float a = 2.0; // valid
float a = float(2); // valid
默认整数常量是有符号的,因此转换为无符号时始终需要强制类型转换:
int a = 2; // valid
uint a = 2; // invalid
uint a = uint(2); // valid
成员
向量类型的单个标量成员可通过“x”、“y”、“z”和“w”成员访问。或者,使用“r”、“g”、“b”和“a”也行且效果相同。使用最适合你需求的方式。
For matrices, use the m[column][row] indexing syntax to access each scalar,
or m[column] to access a vector by column index. For example, for accessing the
y-component of the translation from a mat4 transform matrix (4th column, 2nd line) you use m[3][1] or m[3].y.
构造
向量类型的构造必须始终通过:
// The required amount of scalars
vec4 a = vec4(0.0, 1.0, 2.0, 3.0);
// Complementary vectors and/or scalars
vec4 a = vec4(vec2(0.0, 1.0), vec2(2.0, 3.0));
vec4 a = vec4(vec3(0.0, 1.0, 2.0), 3.0);
// A single scalar for the whole vector
vec4 a = vec4(0.0);
Construction of matrix types requires vectors of the same dimension as the
matrix, interpreted as columns. You can also build a diagonal matrix using matx(float) syntax.
Accordingly, mat4(1.0) is an identity matrix.
mat2 m2 = mat2(vec2(1.0, 0.0), vec2(0.0, 1.0));
mat3 m3 = mat3(vec3(1.0, 0.0, 0.0), vec3(0.0, 1.0, 0.0), vec3(0.0, 0.0, 1.0));
mat4 identity = mat4(1.0);
矩阵也可以由另一维的矩阵构建。有两个规则:
1. If a larger matrix is constructed from a smaller matrix, the additional rows and columns are set to the values they would have in an identity matrix. 2. If a smaller matrix is constructed from a larger matrix, the top, left submatrix of the larger matrix is used.
mat3 basis = mat3(MODEL_MATRIX);
mat4 m4 = mat4(basis);
mat2 m2 = mat2(m4);
调换
只要结果是另一种向量类型(或标量),就可以按任意顺序获得组件的任意组合。百闻不如一见:
vec4 a = vec4(0.0, 1.0, 2.0, 3.0);
vec3 b = a.rgb; // Creates a vec3 with vec4 components.
vec3 b = a.ggg; // Also valid; creates a vec3 and fills it with a single vec4 component.
vec3 b = a.bgr; // "b" will be vec3(2.0, 1.0, 0.0).
vec3 b = a.xyz; // Also rgba, xyzw are equivalent.
vec3 b = a.stp; // And stpq (for texture coordinates).
float c = b.w; // Invalid, because "w" is not present in vec3 b.
vec3 c = b.xrt; // Invalid, mixing different styles is forbidden.
b.rrr = a.rgb; // Invalid, assignment with duplication.
b.bgr = a.rgb; // Valid assignment. "b"'s "blue" component will be "a"'s "red" and vice versa.
精度
可以为数据类型添加精度修饰符;将它们用于 uniform、变量、参数、varying:
lowp vec4 a = vec4(0.0, 1.0, 2.0, 3.0); // low precision, usually 8 bits per component mapped to 0-1
mediump vec4 a = vec4(0.0, 1.0, 2.0, 3.0); // medium precision, usually 16 bits or half float
highp vec4 a = vec4(0.0, 1.0, 2.0, 3.0); // high precision, uses full float or integer range (32 bit default)
对某些操作使用较低的精度可以加快所涉及的数学运算速度(但代价是精度较低)。这在顶点处理函数中鲜有需要(大多数情况下需要全精度),但在片段处理函数中通常很有用。
某些架构(主要是移动架构)可以从中受益匪浅,但也存在一些缺点,例如精度转换的额外开销。有关更多信息,请参阅目标架构的文档。在许多情况下,移动驱动程序会导致不一致或意外的行为,除非必要,否则最好避免指定精度。
数组
数组是用于多个相似类型的变量的容器。
局部数组
局部数组在函数中声明。它们可以使用除采样器之外的所有允许的数据类型。数组声明遵循 C 样式语法:[const] + [precision] + typename + identifier + [array size]。
void fragment() {
    float arr[3];
}
它们可以在开始时被初始化,像这样:
float float_arr[3] = float[3] (1.0, 0.5, 0.0); // first constructor

int int_arr[3] = int[] (2, 1, 0); // second constructor

vec2 vec2_arr[3] = { vec2(1.0, 1.0), vec2(0.5, 0.5), vec2(0.0, 0.0) }; // third constructor

bool bool_arr[] = { true, true, false }; // fourth constructor - size is defined automatically from the element count
你可以在一个表达式中声明多个数组(即使大小不同):
float a[3] = float[3] (1.0, 0.5, 0.0),
b[2] = { 1.0, 0.5 },
c[] = { 0.7 },
d = 0.0,
e[5];
要访问一个数组元素,请使用索引语法:
float arr[3];

arr[0] = 1.0; // setter

COLOR.r = arr[0]; // getter
数组还有一个内置函数 .length()(不要与内置函数 length() 混淆)。它不接受任何参数,并将返回数组的大小。
float arr[] = { 0.0, 1.0, 0.5, -1.0 };
for (int i = 0; i < arr.length(); i++) {
    // ...
}
备注
如果你使用的索引小于 0 或大于数组大小——着色器将崩溃并中断渲染。为防止这种情况,请使用 length()、if 或 clamp() 函数来确保索引介于 0 和数组长度之间。务必仔细测试和检查你的代码。如果你传递一个常量表达式或数字,编辑器将检查其边界以防止这种崩溃。
全局数组
You can declare arrays in global space as either const or uniform:
shader_type spatial;

const lowp vec3 v[1] = lowp vec3[1] ( vec3(0, 0, 1) );
uniform lowp vec3 w[1];

void fragment() {
  ALBEDO = v[0] + w[0];
}
备注
Global arrays use the same syntax as local arrays, except with a const
or uniform added to their declaration. Note that uniform arrays can't
have a default value.
常量
在变量声明前使用 const 关键字,可以使该变量不可变, 这意味着它不能被修改。除采样器外的所有基本类型都可以被声明为常量。访问和使用常量值的速度比使用 uniform 的速度略快。常量必须在其声明时被初始化。
const vec2 a = vec2(0.0, 1.0);
vec2 b;

a = b; // invalid
b = a; // valid
常量不能被修改,也不能有提示,但可以在单个表达式中声明多个常量(如果它们具有相同的类型),例如
const vec2 V1 = vec2(1, 1), V2 = vec2(2, 2);
与变量类似,数组也可以用 const 来声明。
const float arr[] = { 1.0, 0.5, 0.0 };

arr[0] = 1.0; // invalid

COLOR.r = arr[0]; // valid
常量既可以被全局声明(在任何函数之外),也可以被本地声明(在函数内部)。当你想要访问整个着色器中不需要修改的值时,全局常量非常有用。与 uniform 一样,全局常量在所有着色器阶段之间共享,但在着色器外部无法访问。
shader_type spatial;

const float GOLDEN_RATIO = 1.618033988749894;
float 类型常量的初始化必须使用整数部分后的 . 符号或科学计数法。还支持可选的 f 后缀。
float a = 1.0;
float b = 1.0f; // same, using suffix for clarity
float c = 1e-1; // gives 0.1 by using the scientific notation
uint(无符号整数)类型的常量必须有后缀 u,以区别于有符号整数。或者,也可以使用 uint(x) 内置转换函数来实现这一点。
uint a = 1u;
uint b = uint(1);
结构体
结构体是一种复合类型,可以对着色器代码进行更好的抽象。你可以在全局范围内声明它们,如下所示:
struct PointLight {
    vec3 position;
    vec3 color;
    float intensity;
};
声明后,你可以像这样实例化和初始化它们:
void fragment()
{
    PointLight light;
    light.position = vec3(0.0);
    light.color = vec3(1.0, 0.0, 0.0);
    light.intensity = 0.5;
}
或者使用结构体的构造函数达到同样的效果:
PointLight light = PointLight(vec3(0.0), vec3(1.0, 0.0, 0.0), 0.5);
结构体中可以包含其他结构体或者数组,你还可以把它们作为全局常量实例化:
shader_type spatial;

...

struct Scene {
    PointLight lights[2];
};

const Scene scene = Scene(PointLight[2](PointLight(vec3(0.0, 0.0, 0.0), vec3(1.0, 0.0, 0.0), 1.0), PointLight(vec3(0.0, 0.0, 0.0), vec3(1.0, 0.0, 0.0), 1.0)));

void fragment()
{
    ALBEDO = scene.lights[0].color;
}
也可以把它们传递给函数:
shader_type canvas_item;

...

Scene construct_scene(PointLight light1, PointLight light2) {
    return Scene({light1, light2});
}

void fragment()
{
    COLOR.rgb = construct_scene(PointLight(vec3(0.0, 0.0, 0.0), vec3(1.0, 0.0, 0.0), 1.0), PointLight(vec3(0.0, 0.0, 0.0), vec3(1.0, 0.0, 1.0), 1.0)).lights[0].color;
}
运算符
Godot 着色语言支持与 GLSL ES 3.0 相同的运算符集。以下是按优先顺序列出的运算符列表:
优先级 |
类 |
运算符 |
1(最高) |
括号分组 |
() |
2 |
一元 |
+, -, !, ~ |
3 |
乘除余 |
/, *, % |
4 |
加减法 |
+, - |
5 |
按位移位 |
<<, >> |
6 |
关系比较 |
<, >, <=, >= |
7 |
相等比较 |
==, != |
8 |
按位与 |
& |
9 |
按位异或 |
^ |
10 |
按位或 |
| |
11 |
逻辑与 |
&& |
12(最低) |
逻辑或 |
|| |
备注
Most operators that accept vectors or matrices (multiplication, division, etc) operate component-wise, meaning the function is applied to the first value of each vector and then on the second value of each vector, etc. Some examples:
Operation |
Equivalent Scalar Operation |
|---|---|
|
|
|
|
|
|
The GLSL Language Specification says under section 5.10 Vector and Matrix Operations:
With a few exceptions, operations are component-wise. Usually, when an operator operates on a vector or matrix, it is operating independently on each component of the vector or matrix, in a component-wise fashion. [...] The exceptions are matrix multiplied by vector, vector multiplied by matrix, and matrix multiplied by matrix. These do not operate component-wise, but rather perform the correct linear algebraic multiply.
控制流
Godot 着色语言支持最常见的控制流类型:
// `if`, `else if` and `else`.
if (cond) {

} else if (other_cond) {

} else {

}

// Ternary operator.
// This is an expression that behaves like `if`/`else` and returns the value.
// If `cond` evaluates to `true`, `result` will be `9`.
// Otherwise, `result` will be `5`.
int result = cond ? 9 : 5;

// `switch`.
switch (i) { // `i` should be a signed integer expression.
    case -1:
        break;
    case 0:
        return; // `break` or `return` to avoid running the next `case`.
    case 1: // Fallthrough (no `break` or `return`): will run the next `case`.
    case 2:
        break;
    //...
    default: // Only run if no `case` above matches. Optional.
        break;
}

// `for` loop. Best used when the number of elements to iterate on
// is known in advance.
for (int i = 0; i < 10; i++) {

}

// `while` loop. Best used when the number of elements to iterate on
// is not known in advance.
while (cond) {

}

// `do while`. Like `while`, but always runs at least once even if `cond`
// never evaluates to `true`.
do {

} while (cond);
请记住,在现代 GPU 中,无限循环可以存在,并可能冻结你的应用程序(包括编辑器)。Godot 无法保护你免受这种影响,因此请小心,不要犯这种错误!
此外,将浮点值与数字进行比较时,请确保将它们与一个范围而不是一个精确数字进行比较。
类似 if (value == 0.3) 的比较可能不会评估为 true。浮点数学通常是近似的,可能会与预期不符。它还可能根据硬件的不同而表现不同。
不要这样做。
float value = 0.1 + 0.2;

// May not evaluate to `true`!
if (value == 0.3) {
    // ...
}
相反,始终使用 epsilon 值进行范围比较。浮点数越大(浮点数越不精确),则 epsilon 值应该越大。
const float EPSILON = 0.0001;
if (value >= 0.3 - EPSILON && value <= 0.3 + EPSILON) {
    // ...
}
有关更多信息,请参阅 floating-point-gui.de。
丢弃
Fragment, light, and custom functions (called from fragment or light) can use the
discard keyword. If used, the fragment is discarded and nothing is written.
请注意,使用 discard 会降低性能,因为它会阻止预深度阶段在使用着色器的任何表面上起作用。此外,被丢弃的像素仍需在顶点着色器中渲染,这意味着,与一开始就不渲染任何对象相比,在所有像素上使用 discard 的着色器的渲染成本仍然更高。
函数
可以在 Godot 着色器中定义函数。它们使用以下语法:
ret_type func_name(args) {
    return ret_type; // if returning a value
}

// a more specific example:

int sum2(int a, int b) {
    return a + b;
}
你只能使用已在调用它们的函数上方(编辑器中较高位置)定义的函数。重新定义已在上方定义的函数(或使用内置函数名称)将导致错误。
函数参数可以有特殊的限定符:
in:表示该参数仅供读取(默认)。
out:表示该参数仅供写入。
inout:表示参数完全通过引用传递。
const:表示参数是常量且不能更改,可以与 in 限定符结合使用。
以下为示例:
void sum2(int a, int b, inout int result) {
    result = a + b;
}
Function overloading is supported. You can define multiple functions with the same
name, but different arguments. Note that implicit casting in overloaded
function calls is not allowed, such as from int to float (1 to 1.0).
vec3 get_color(int t) {
    return vec3(1, 0, 0); // Red color.
}
vec3 get_color(float t) {
    return vec3(0, 1, 0); // Green color.
}
void fragment() {
    vec3 red = get_color(1);
    vec3 green = get_color(1.0);
}
Varying
要从顶点处理器函数往片段(或者灯光)处理器函数里发送数据,可以使用 varying。它们在顶点处理器中为每个图元顶点设置,并且该值对片段处理器中的每个像素进行插值。
shader_type spatial;

varying vec3 some_color;

void vertex() {
    some_color = NORMAL; // Make the normal the color.
}

void fragment() {
    ALBEDO = some_color;
}

void light() {
    DIFFUSE_LIGHT = some_color * 100; // optionally
}
Varying 也可以是一个数组:
shader_type spatial;

varying float var_arr[3];

void vertex() {
    var_arr[0] = 1.0;
    var_arr[1] = 0.0;
}

void fragment() {
    ALBEDO = vec3(var_arr[0], var_arr[1], var_arr[2]); // red color
}
也可以使用 varying 关键字将数据从片段处理器发送到灯光处理器。在片段函数中赋值,然后在灯光函数中使用即可。
shader_type spatial;

varying vec3 some_light;

void fragment() {
    some_light = ALBEDO * 100.0; // Make a shining light.
}

void light() {
    DIFFUSE_LIGHT = some_light;
}
请注意,在自定义函数或灯光处理器函数中可能无法为 varying 赋值,例如:
shader_type spatial;

varying float test;

void foo() {
    test = 0.0; // Error.
}

void vertex() {
    test = 0.0;
}

void light() {
    test = 0.0; // Error too.
}
加入这一限制的目的是为了防止在初始化前进行错误的使用。
插值限定符
某些值在着色管道期间进行插值。你可以使用插值限定符来修改这些插值的方式。
shader_type spatial;

varying flat vec3 our_color;

void vertex() {
    our_color = COLOR.rgb;
}

void fragment() {
    ALBEDO = our_color;
}
有两种可能的插值限定符:
限定符 |
描述 |
|---|---|
flat |
该值未插值。 |
smooth |
该值以透视校正方式进行插值。这是默认值。 |
Uniform
Passing values to shaders is possible with uniforms, which are defined in the
global scope of the shader, outside of functions. When a shader is later
assigned to a material, the uniforms will appear as editable parameters in the
material's inspector. Uniforms can't be written from within the shader. Any
data type except for void can be a uniform.
shader_type spatial;

uniform float some_value;

uniform vec3 colors[3];
You can set uniforms in the editor in the material's inspector. Alternately, you can set them from code.
Uniform hints
Godot provides optional uniform hints to make the compiler understand what the uniform is used for, and how the editor should allow users to modify it.
shader_type spatial;

uniform vec4 color : source_color;
uniform float amount : hint_range(0, 1);
uniform vec4 other_color : source_color = vec4(1.0); // Default values go after the hint.
uniform sampler2D image : source_color;
Uniform 也可以分配默认值:
shader_type spatial;

uniform vec4 some_vector = vec4(0.0);
uniform vec4 some_color : source_color = vec4(1.0);
请注意,同时添加默认值和提示时,默认值应该写在提示的后面。
Full list of uniform hints below:
类型 |
提示 |
描述 |
|---|---|---|
vec3、vec4 |
source_color |
用作颜色。 |
int |
hint_enum("String1", "String2") |
Displays int input as a dropdown widget in the editor. |
int、float |
hint_range(min, max[, step]) |
限制取值范围(最小值/最大值/步长)。 |
sampler2D |
source_color |
用作反照颜色。 |
sampler2D |
hint_normal |
用作法线贴图。 |
sampler2D |
hint_default_white |
作为值或反照颜色,默认为不透明白色。 |
sampler2D |
hint_default_black |
作为值或反照颜色,默认为不透明黑色。 |
sampler2D |
hint_default_transparent |
作为值或反照颜色,默认为透明黑色。 |
sampler2D |
hint_anisotropy |
作为 FlowMap,默认为右。 |
sampler2D |
hint_roughness[_r, _g, _b, _a, _normal, _gray] |
用于导入时的粗糙度限制器(尝试减少镜面锯齿)。 |
sampler2D |
filter[_nearest, _linear][_mipmap][_anisotropic] |
启用指定的纹理过滤。 |
sampler2D |
repeat[_enable, _disable] |
启用纹理重复。 |
sampler2D |
hint_screen_texture |
纹理是屏幕纹理。 |
sampler2D |
hint_depth_texture |
纹理是深度纹理。 |
sampler2D |
hint_normal_roughness_texture |
纹理是法线粗糙度纹理(仅在 Forward+ 中受支持)。 |
Using hint_enum
You can access int values as a readable dropdown widget using the hint_enum uniform:
uniform int noise_type : hint_enum("OpenSimplex2", "Cellular", "Perlin", "Value") = 0;
You can assign explicit values to the hint_enum uniform using colon syntax similar to GDScript:
uniform int character_speed: hint_enum("Slow:30", "Average:60", "Very Fast:200") = 60;
The value will be stored as an integer, corresponding to the index of the selected
option (i.e. 0, 1, or 2) or the value assigned by colon syntax
(i.e. 30, 60, or 200). When setting the value with
set_shader_parameter(), you must use the integer value, not the String
name.
Using source_color
Any texture which contains sRGB color data requires a source_color hint
in order to be correctly sampled. This is because Godot renders in linear
color space, but some textures contain sRGB color data. If this hint is not
used, the texture will appear washed out.
Albedo and color textures should typically have a source_color hint. Normal,
roughness, metallic, and height textures typically do not need a source_color
hint.
Using source_color hint is required in the Forward+ and Mobile renderers,
and in canvas_item shaders when HDR 2D
is enabled. The source_color hint is optional for the Compatibility renderer,
and for canvas_item shaders if HDR 2D is disabled. However, it is
recommended to always use the source_color hint, because it works even
if you change renderers or disable HDR 2D.
Uniform groups
To group multiple uniforms in a section in the inspector, you can use a
group_uniform keyword like this:
group_uniforms MyGroup;
uniform sampler2D test;
结束分组的方法是:
group_uniforms;
这一语法还支持子分组(在此之前不需要声明基础分组):
group_uniforms MyGroup.MySubgroup;
全局 Uniform
有时你会想要统一修改很多不同着色器中的某个参数。使用普通的 uniform 就会很麻烦,因为你需要记录这些着色器,并且需要一个个地设 uniform。使用全局 uniform 就可以创建并更新所有着色器中均可以使用的 uniform,所有类型的着色器都适用(canvas_item、spatial、particles、sky、fog)。
全局 uniform 适用于能够影响场景中大量对象的环境效果,例如玩家在附近时的植被弯曲效果、物体随风移动的效果等。
备注
Global uniforms are not the same as global scope for an individual shader. While regular uniforms are defined outside of shader functions and are therefore the global scope of the shader, global uniforms are global to all shaders in the entire project (but within each shader, are also in the global scope).
要创建全局 uniform,请打开项目设置,切换到着色器全局量选项卡。为 uniform 指定名称(区分大小写)和类型,然后点击对话框右上角的添加。点击 uniform 列表中的值即可编辑 uniform 的取值:

在“项目设置”的“着色器全局量”中添加全局 uniform
创建全局 uniform 之后,在着色器中的使用方法如下:
shader_type canvas_item;

global uniform vec4 my_color;

void fragment() {
    COLOR = my_color.rgb;
}
请注意,保存着色器的时候该全局 uniform 必须在“项目设置”中存在,否则编译就会失败。虽然可以在着色器代码中使用 global uniform vec4 my_color = ... 赋默认值,但是这个默认值会被忽略,因为全局 uniform 必须在“项目设置”中定义。
To change the value of a global uniform at runtime, use the RenderingServer.global_shader_parameter_set method in a script:
RenderingServer.global_shader_parameter_set("my_color", Color(0.3, 0.6, 1.0))
全局 uniform 可以重复赋值,不会影响性能,因为设置数据不需要在 CPU 和 GPU 之间进行同步。
You can also add or remove global uniforms at runtime:
RenderingServer.global_shader_parameter_add("my_color", RenderingServer.GLOBAL_VAR_TYPE_COLOR, Color(0.3, 0.6, 1.0))
RenderingServer.global_shader_parameter_remove("my_color")
Adding or removing global uniforms at runtime has a performance cost, although it's not as pronounced compared to getting global uniform values from a script (see the warning below).
警告
While you can query the value of a global uniform at runtime in a script
using RenderingServer.global_shader_parameter_get("uniform_name"), this
has a large performance penalty as the rendering thread needs to synchronize
with the calling thread.
因此,不建议在脚本中频繁读取全局着色器 uniform 的取值。如果你需要在设值之后用脚本读取,请考虑创建一个自动加载,在设置需要查询的全局 uniform 的同时保存对应的值。
单实例 uniform
备注
只有 spatial(3D)着色器中才可以使用单实例 uniform。
Sometimes, you want to modify a parameter on each node using the material. As an example, in a forest full of trees, when you want each tree to have a slightly different color that is editable by hand. Without per-instance uniforms, this requires creating a unique material for each tree (each with a slightly different hue). This makes material management more complex, and also has a performance overhead due to the scene requiring more unique material instances. Vertex colors could also be used here, but they'd require creating unique copies of the mesh for each different color, which also has a performance overhead.
单实例 uniform 设置在每个 GeometryInstance3D 上,而不是在每个材质实例上。在处理指定了多种材质的网格或多重网格设置时,请考虑这一点。
shader_type spatial;

// Provide a hint to edit as a color. Optionally, a default value can be provided.
// If no default value is provided, the type's default is used (e.g. opaque black for colors).
instance uniform vec4 my_color : source_color = vec4(1.0, 0.5, 0.0, 1.0);

void fragment() {
    ALBEDO = my_color.rgb;
}
在保存着色器后,你可以在检查器中更改单实例 uniform 的值:
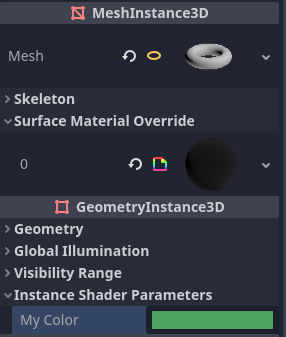
在检查器中的 GeometryInstance3D 部分设置单实例 uniform 的值
Per-instance uniform values can also be set at runtime using set_instance_shader_parameter method on a node that inherits from GeometryInstance3D:
$MeshInstance3D.set_instance_shader_parameter("my_color", Color(0.3, 0.6, 1.0))
在使用单实例 uniform 时,你应该注意一些限制:
单实例 uniform 不支持纹理,仅可以是常规的标量和向量类型。作为解决方法,你可以传递一个纹理数组作为常规 uniform,之后传递一个单实例 uniform 作为绘制时纹理的索引。
There is a practical maximum limit of 16 instance uniforms per shader.
If your mesh uses multiple materials, the parameters for the first mesh material found will "win" over the subsequent ones, unless they have the same name, index and type. In this case, all parameters are affected correctly.
If you run into the above situation, you can avoid clashes by manually specifying the index (0-15) of the instance uniform by using the
instance_indexhint:
instance uniform vec4 my_color : source_color, instance_index(5);
Setting uniforms from code
You can set uniforms from GDScript using the set_shader_parameter() method:
material.set_shader_parameter("some_value", some_value)

material.set_shader_parameter("colors", [Vector3(1, 0, 0), Vector3(0, 1, 0), Vector3(0, 0, 1)])
备注
The first argument to set_shader_parameter() is the name of the uniform
in the shader. It must match exactly to the name of the uniform in
the shader or else it will not be recognized.
GDScript 使用的变量类型与 GLSL 不同,所以当把变量从 GDScript 传递到着色器时,Godot 会自动转换类型。以下是相应类型的表格:
GLSL 类型 |
GDScript 类型 |
注意 |
|---|---|---|
bool |
bool |
|
bvec2 |
int |
按位打包整数,其中位 0 (LSB) 对应 x。 例如,值为 (bx, by) 的 bvec2 可以按以下方式创建: bvec2_input: int = (int(bx)) | (int(by) << 1)
|
bvec3 |
int |
按位打包整数,其中位 0 (LSB) 对应 x。 |
bvec4 |
int |
按位打包整数,其中位 0 (LSB) 对应 x。 |
int |
int |
|
ivec2 |
Vector2i |
|
ivec3 |
Vector3i |
|
ivec4 |
Vector4i |
|
uint |
int |
|
uvec2 |
Vector2i |
|
uvec3 |
Vector3i |
|
uvec4 |
Vector4i |
|
float |
float |
|
vec2 |
Vector2 |
|
vec3 |
Vector3、Color |
使用 Color 时会将其解释为 (r, g, b)。 |
vec4 |
Vector4、Color、Rect2、Plane、Quaternion |
使用 Color 时会将其解释为 (r, g, b, a)。 使用 Rect2 时会将其解释为 (position.x, position.y, size.x, size.y)。 使用 Plane 时会将其解释为 (normal.x, normal.y, normal.z, d)。 |
mat2 |
Transform2D |
|
mat3 |
Basis |
|
mat4 |
Projection、Transform3D |
使用 Transform3D 时,向量 w 为单位向量。 |
sampler2D |
Texture2D |
|
isampler2D |
Texture2D |
|
usampler2D |
Texture2D |
|
sampler2DArray |
Texture2DArray |
|
isampler2DArray |
Texture2DArray |
|
usampler2DArray |
Texture2DArray |
|
sampler3D |
Texture3D |
|
isampler3D |
Texture3D |
|
usampler3D |
Texture3D |
|
samplerCube |
Cubemap |
See 更改导入类型 for instructions on importing cubemaps for use in Godot. |
samplerCubeArray |
CubemapArray |
Only supported in Forward+ and Mobile, not Compatibility. |
samplerExternalOES |
ExternalTexture |
Only supported in Compatibility/Android platform. |
备注
Be careful when setting shader uniforms from GDScript, since no error will be thrown if the type does not match. Your shader will just exhibit undefined behavior. Specifically, this includes setting a GDScript int/float (64 bit) into a Godot shader language int/float (32 bit). This may lead to unintended consequences in cases where high precision is required.
Uniform limits
There is a limit to the total size of shader uniforms that you can use
in a single shader. On most desktop platforms, this limit is 65536
bytes, or 4096 vec4 uniforms. On mobile platforms, the limit is
typically 16384 bytes, or 1024 vec4 uniforms. Vector uniforms
smaller than a vec4, such as vec2 or vec3, are padded to
the size of a vec4. Scalar uniforms such as int or float
are not padded, and bool is padded to the size of an int.
Arrays count as the total size of their contents. If you need a uniform array that is larger than this limit, consider packing the data into a texture instead, since the contents of a texture do not count towards this limit, only the size of the sampler uniform.
内置变量
A large number of built-in variables are available, like UV, COLOR and
VERTEX. What variables are available depends on the type of shader
(spatial, canvas_item, particle, etc) and the
function used (vertex, fragment, light, start, process,
``sky, or fog). For a list of the built-in variables that are available,
please see the corresponding pages:
内置函数
A large number of built-in functions are supported, conforming to GLSL ES 3.0. See the Built-in functions page for details.
注释
The shading language supports the same comment syntax as used in C# and C++, using
//for single-line comments and/* */for multi-line comments:此外,你还可以使用当将鼠标悬停在着色器参数上时显示在检查器中的文档注释。当前,仅当将文档注释放置在
uniform声明正上方时,才支持该注释。这些文档注释仅支持多行注释语法,并且必须使用两个前导星号(/**),而不是仅使用一个(/*):后续行上的星号不是必需的,但根据《着色器风格指南》建议使用。这些星号会被检查器自动删除,因此它们不会出现在工具提示中。