你的第二个 3D 着色器
From a high-level, what Godot does is give the user a bunch of parameters that
can be optionally set (AO, SSS_Strength, RIM, etc.). These
parameters correspond to different complex effects (Ambient Occlusion,
SubSurface Scattering, Rim Lighting, etc.). When not written to, the code is
thrown out before it is compiled and so the shader does not incur the cost of
the extra feature. This makes it easy for users to have complex PBR-correct
shading, without writing complex shaders. Of course, Godot also allows you to
ignore all these parameters and write a fully customized shader.
有关这些参数的完整列表, 请参见 空间着色器 参考文档.
A difference between the vertex function and a fragment function is that the
vertex function runs per vertex and sets properties such as VERTEX
(position) and NORMAL, while the fragment shader runs per pixel and, most
importantly, sets the ALBEDO color of the MeshInstance3D.
第一个空间片段函数
As mentioned in the previous part of this tutorial. The standard use of the
fragment function in Godot is to set up different material properties and let
Godot handle the rest. In order to provide even more flexibility, Godot also
provides things called render modes. Render modes are set at the top of the
shader, directly below shader_type, and they specify what sort of
functionality you want the built-in aspects of the shader to have.
For example, if you do not want to have lights affect an object, set the render
mode to unshaded:
render_mode unshaded;
你还可以将多个渲染模式堆叠在一起。例如,如果你想使用卡通材质而不是更真实的 PBR 材质,将漫反射模式和镜面反射模式设置为卡通:
render_mode diffuse_toon, specular_toon;
这个内置功能模型允许你通过更改几个参数来编写复杂的自定义着色器.
有关渲染模式的完整列表, 请参见空间着色器参考 Spatial shader reference.
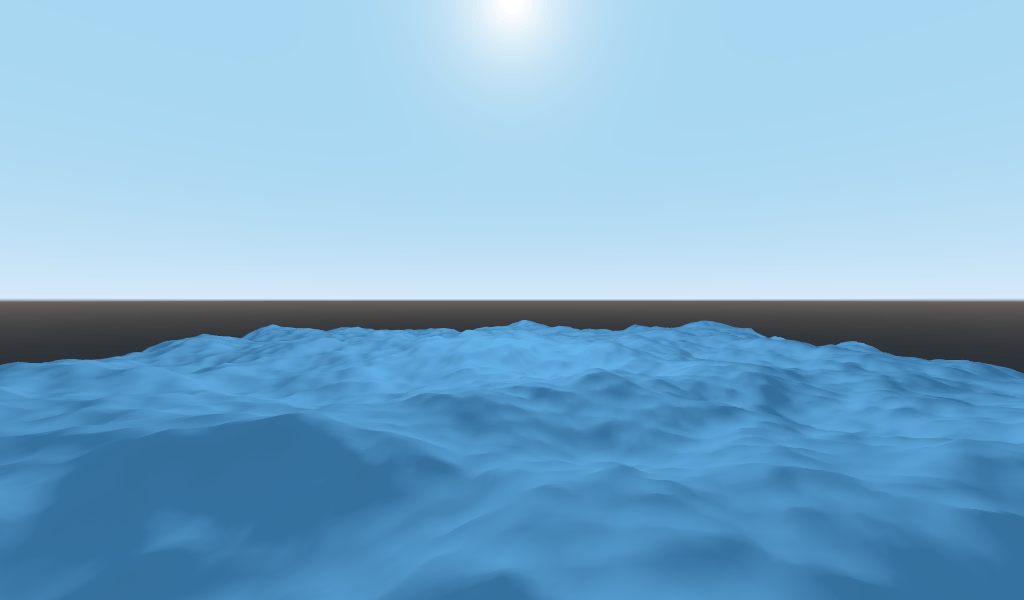
在本教程的这一部分中, 我们将介绍如何将前一部分的崎岖地形变成海洋.
首先让我们设置水的颜色. 我们通过设置 ALBEDO 来做到这一点.
ALBEDO 是一个 vec3 , 包含物体的颜色.
我们把它调成蓝色.
void fragment() {
  ALBEDO = vec3(0.1, 0.3, 0.5);
}
我们将其设置为深蓝色, 因为水的大部分蓝色来自天空的反射.
The PBR model that Godot uses relies on two main parameters: METALLIC and
ROUGHNESS.
ROUGHNESS specifies how smooth/rough the surface of a material is. A low
ROUGHNESS will make a material appear like a shiny plastic, while a high
roughness makes the material appear more solid in color.
METALLIC 指定该物体有多像金属, 它最好设置为接近 0 或 1 . 把 METALLIC 看作是改变反射和 ALBEDO 颜色之间的平衡. 高的 METALLIC 几乎完全忽略了 ALBEDO , 看起来像天空的镜子. 而低的 METALLIC 对天空的颜色和 ALBEDO 的颜色有一个更平实的表现.
ROUGHNESS increases from 0 to 1 from left to right while
METALLIC increase from 0 to 1 from top to bottom.
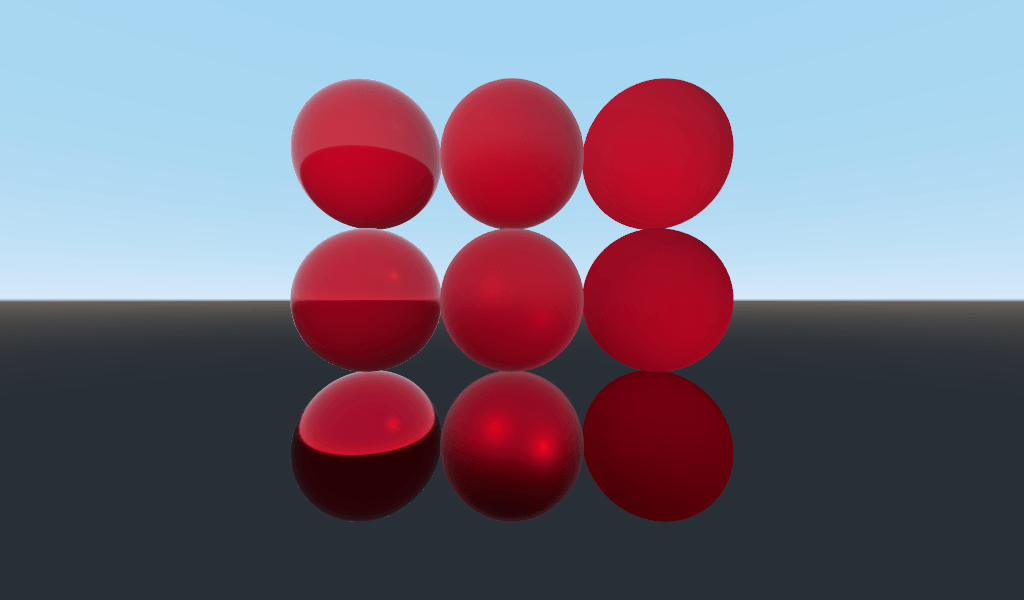
备注
METALLIC should be close to 0 or 1 for proper PBR shading.
Only set it between them for blending between materials.
水不是金属,所以我们将其 METALLIC 属性设置成 0.0。水的反射性也很高,因此我们将其``ROUGHNESS`` 属性也设置得非常低。
void fragment() {
  METALLIC = 0.0;
  ROUGHNESS = 0.01;
  ALBEDO = vec3(0.1, 0.3, 0.5);
}
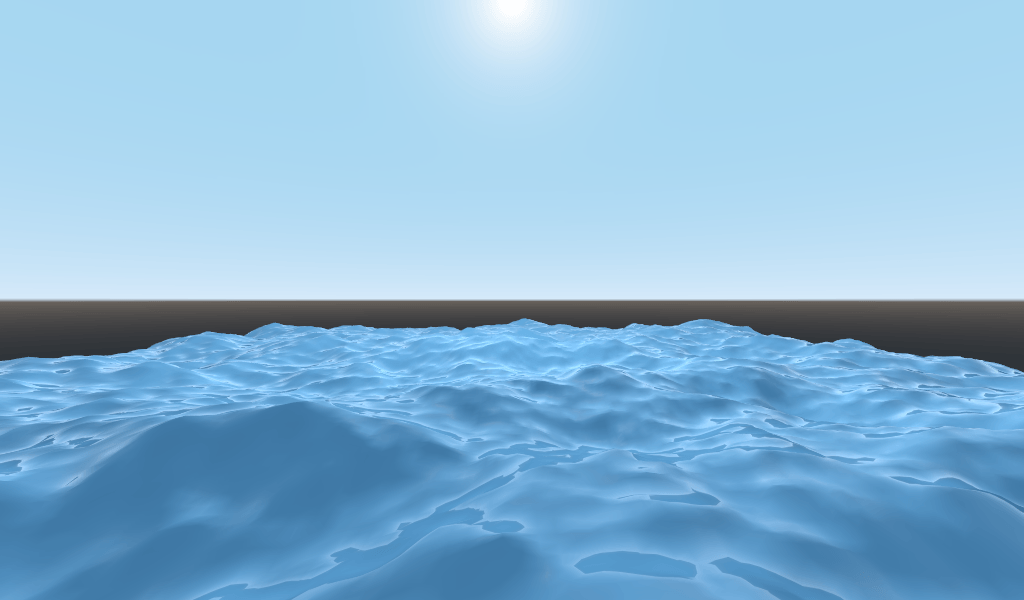
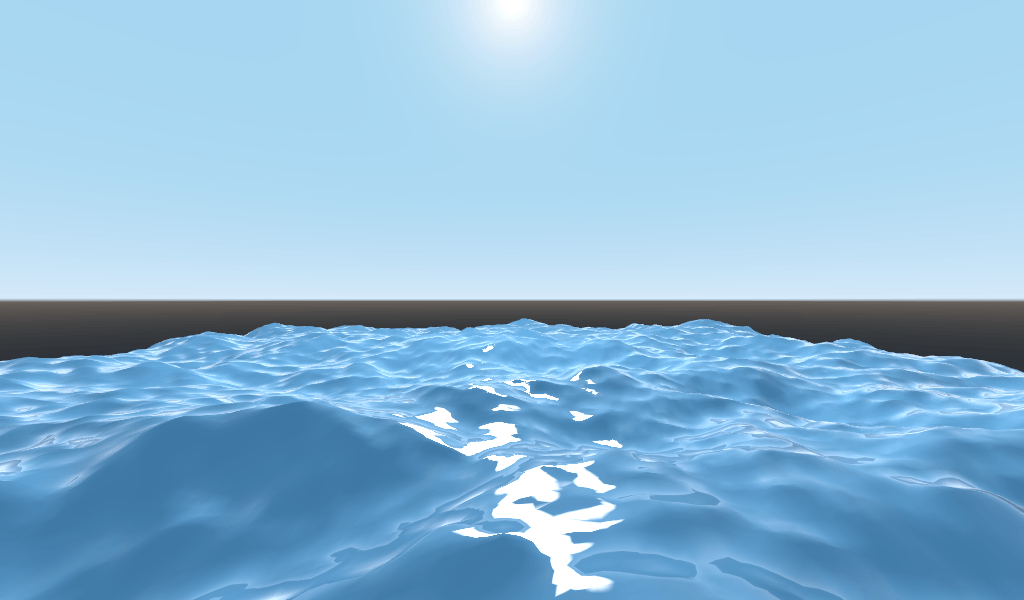
现在,我们有了光滑的塑料外观表面。现在该考虑要模拟的水的某些特定属性了。这里有两种主要的方法可以把诡异的塑料表面变成好看的水。首先是镜面反射(Specular)。镜面反射是那些来自太阳直接反射到你眼里的明亮斑点。第二个是菲涅耳反射(Fresnel)。菲涅尔反射是物体在小角度下更具反射性的属性。这就是为什么你可以看见自己身下的水,却在更远处看见天空倒影的原因。
为了增强镜面反射,我们需要做两件事。首先,由于卡通渲染模式具有更高的镜面反射高光,我们将更改镜面反射为卡通渲染模式。
render_mode specular_toon;
其次, 我们将添加边缘照明. 边缘照明增加了掠射角度的光线效果. 通常, 它用于模拟光线穿过对象边缘上的织物的路径, 但是我们将在此处使用它来帮助实现良好的水润效果.
void fragment() {
  RIM = 0.2;
  METALLIC = 0.0;
  ROUGHNESS = 0.01;
  ALBEDO = vec3(0.1, 0.3, 0.5);
}
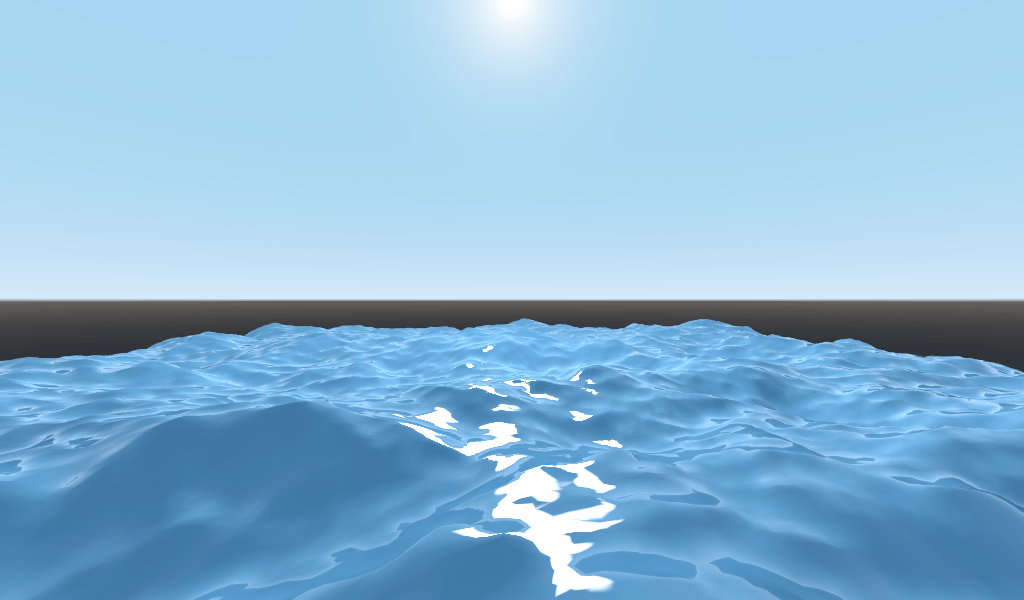
In order to add fresnel reflectance, we will compute a fresnel term in our
fragment shader. Here, we aren't going to use a real fresnel term for
performance reasons. Instead, we'll approximate it using the dot product of the
NORMAL and VIEW vectors. The NORMAL vector points away from the
mesh's surface, while the VIEW vector is the direction between your eye and
that point on the surface. The dot product between them is a handy way to tell
when you are looking at the surface head-on or at a glancing angle.
float fresnel = sqrt(1.0 - dot(NORMAL, VIEW));
And mix it into both ROUGHNESS and ALBEDO. This is the benefit of
ShaderMaterials over StandardMaterial3Ds. With StandardMaterial3D, we could set
these properties with a texture, or to a flat number. But with shaders we can
set them based on any mathematical function that we can dream up.
void fragment() {
  float fresnel = sqrt(1.0 - dot(NORMAL, VIEW));
  RIM = 0.2;
  METALLIC = 0.0;
  ROUGHNESS = 0.01 * (1.0 - fresnel);
  ALBEDO = vec3(0.1, 0.3, 0.5) + (0.1 * fresnel);
}
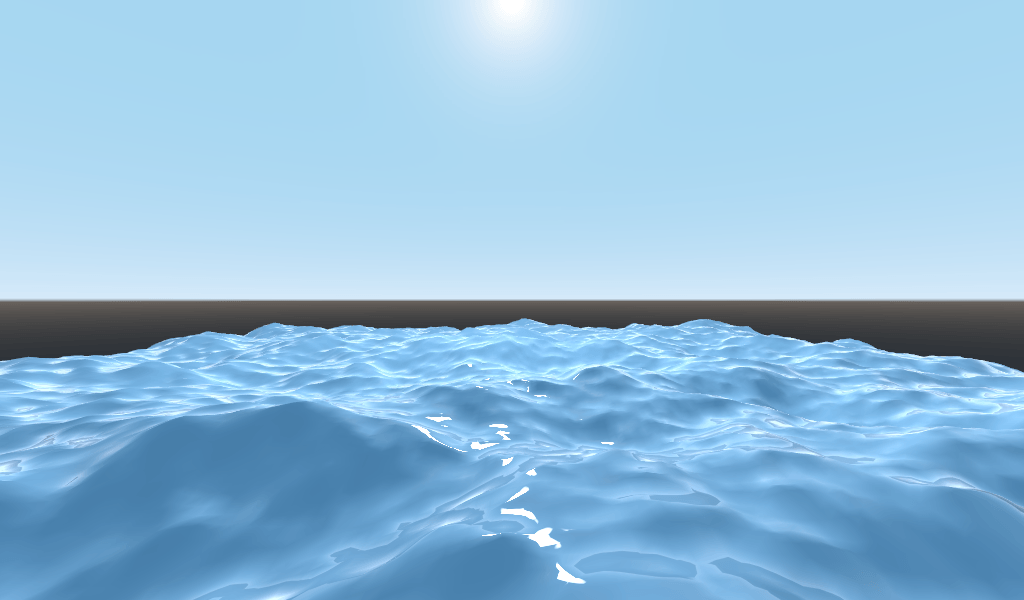
而现在, 只需要5行代码, 你就可以拥有看起来很复杂的水. 现在, 我们有了照明, 这个水看起来太亮了. 让我们把它变暗. 这可以通过减少我们传入 ALBEDO 的 vec3 的值来轻松实现. 让我们把它们设置为 vec3(0.01, 0.03, 0.05) .

用 TIME 做动画
回到顶点功能,我们可以使用内置变量 TIME 对波浪进行动画处理。
TIME 是一个内置变量,可从顶点和片段函数访问。
在上一个教程中,我们通过从高度图读取来计算高度。对于本教程,我们将做同样的事情。将高度图代码放在一个名为 height() 的函数中。
float height(vec2 position) {
  return texture(noise, position / 10.0).x; // Scaling factor is based on mesh size (this PlaneMesh is 10×10).
}
为了在 height() 函数中使用 TIME,我们需要将其传递进去。
float height(vec2 position, float time) {
}
确保其正确传递到顶点函数中.
void vertex() {
  vec2 pos = VERTEX.xz;
  float k = height(pos, TIME);
  VERTEX.y = k;
}
而不是使用法线贴图来计算法线。我们将在 vertex() 函数中手动计算它们。为此,请使用以下代码行。
NORMAL = normalize(vec3(k - height(pos + vec2(0.1, 0.0), TIME), 0.1, k - height(pos + vec2(0.0, 0.1), TIME)));
我们需要手动计算 NORMAL,因为在下一节中,我们将使用数学来创建外观复杂的波形。
现在,我们要通过使 positon 偏移 TIME 的余弦来使 height() 函数更加复杂。
float height(vec2 position, float time) {
  vec2 offset = 0.01 * cos(position + time);
  return texture(noise, (position / 10.0) - offset).x;
}
这会实现缓慢移动的波纹效果, 但显得有点不自然. 下一节将深入探讨, 通过加入更多的数学函数, 来用着色器实现更复杂的效果, 比如更加真实的波纹.
进阶效果:水波
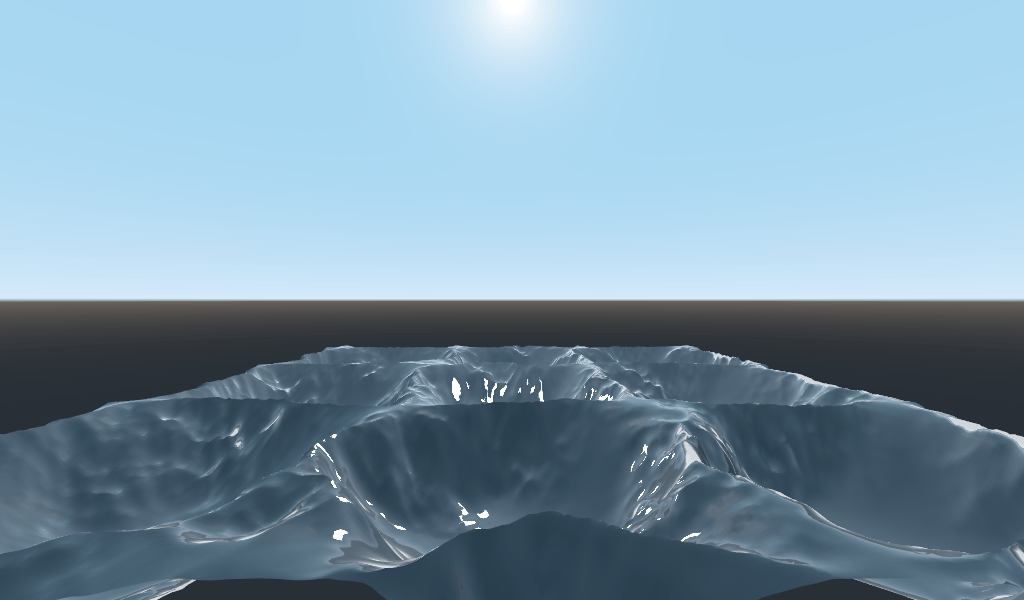
利用数学, 着色器可以实现复杂的效果, 这是着色器的强大之处. 为阐述这一点, 我们将修改 height() 函数和引入新函数 wave() , 来让波纹效果更进一层.
wave() 有一个参数, position, 和在 height() 中一样.
我们将在 height() 函数中多次调用 wave() 函数, 来改变波纹的样子.
float wave(vec2 position){
  position += texture(noise, position / 10.0).x * 2.0 - 1.0;
  vec2 wv = 1.0 - abs(sin(position));
  return pow(1.0 - pow(wv.x * wv.y, 0.65), 4.0);
}
这在一开始会让人觉得很复杂, 所以我们一行一行地来实现.
position += texture(noise, position / 10.0).x * 2.0 - 1.0;
通过 noise 纹理来偏移位置. 这将会使波浪成为曲线, 所以它们将不会是与网格所对齐的直线.
vec2 wv = 1.0 - abs(sin(position));
用 sin() 和 position 定义一个类似波浪的函数. 通常 sin() 波是很圆的. 我们使用 abs() 去将其绝对化, 让它有一个尖锐波峰, 并将其约束于0-1的范围内. 然后我们再从 1.0 中减去, 将峰值放在上方.
return pow(1.0 - pow(wv.x * wv.y, 0.65), 4.0);
将x方向的波乘以y方向的波, 并将其提高到使峰值变得尖锐的幂. 然后从 1.0 中减去它, 使山脊成为山峰, 并提高山脊锐化的能力.
现在我们可以用 wave() 代替 height() 函数的内容.
float height(vec2 position, float time) {
  float h = wave(position);
  return h;
}
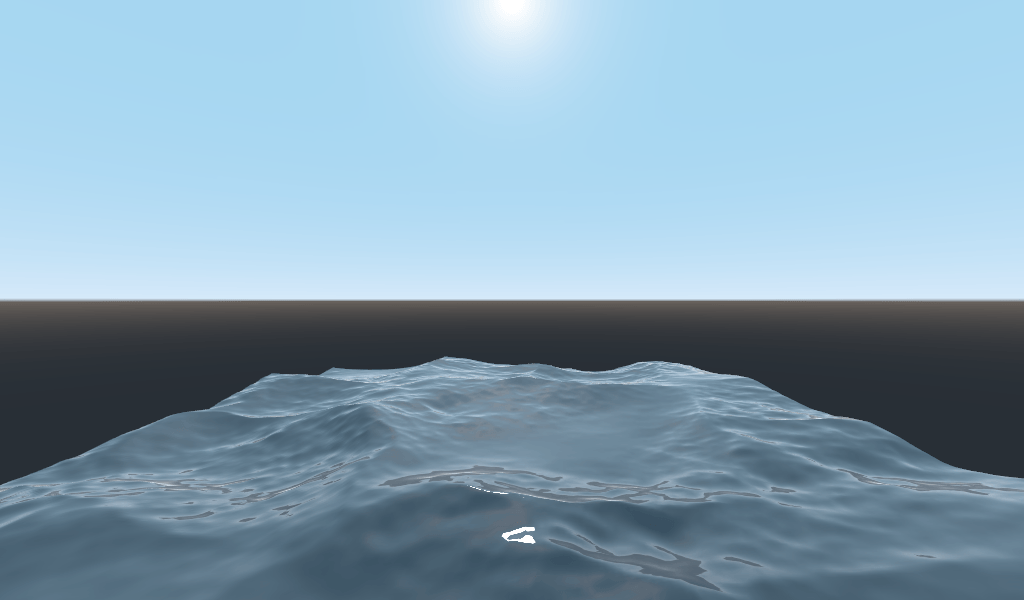
这样一来, 你会得到:
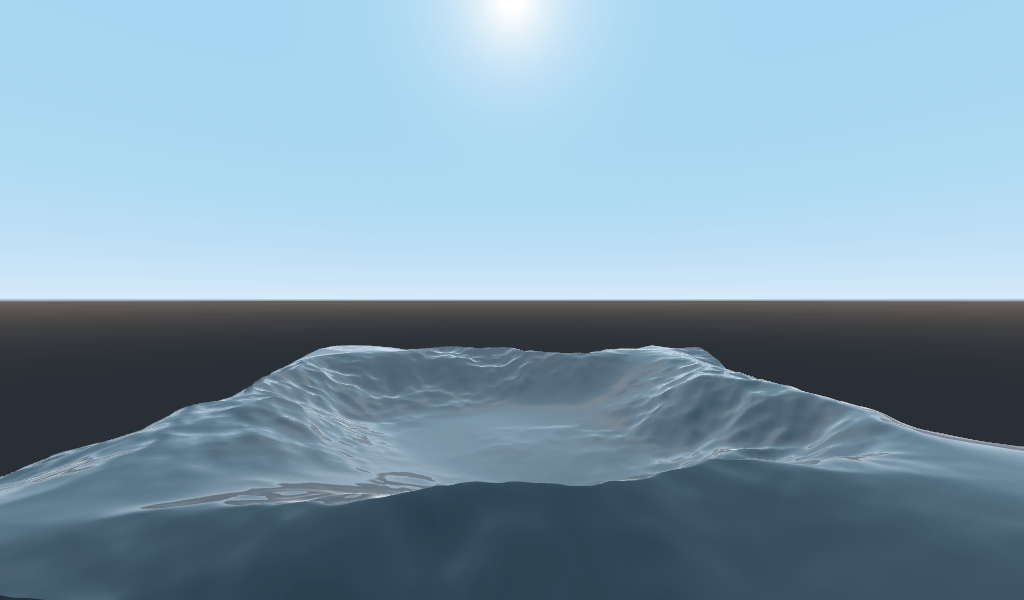
正弦曲线的形状太明显了. 所以让我们把波型分散一下. 我们通过缩放 位置 来实现.
float height(vec2 position, float time) {
  float h = wave(position * 0.4);
  return h;
}
现在它看起来好多了.
如果我们将多个波以不同的频率和幅度彼此叠加, 则可以做得更好. 这意味着我们将按比例缩放每个位置, 以使波形更细或更宽(频率). 我们将乘以波的输出, 以使它们变低或变高(振幅).
下面以四种波形为例, 说明如何将四种波形分层, 以达到更漂亮的波形效果.
float height(vec2 position, float time) {
  float d = wave((position + time) * 0.4) * 0.3;
  d += wave((position - time) * 0.3) * 0.3;
  d += wave((position + time) * 0.5) * 0.2;
  d += wave((position - time) * 0.6) * 0.2;
  return d;
}
Note that we add time to two and subtract it from the other two. This makes the
waves move in different directions creating a complex effect. Also note that the
amplitudes (the number the result is multiplied by) all add up to 1.0. This
keeps the wave in the 0-1 range.
有了这段代码, 你应该可以得到更复杂的波形, 而你所要做的只是增加一点数学运算!
有关空间着色器的更多信息, 请阅读 Shading Language 文档和 Spatial Shaders 文档. 也可以看看 Shading 部分 和 3D 部分的高级教程.