XR 动作映射
Godot has an action map feature as part of the XR system. At this point in time this system is part of the OpenXR module. There are plans to encompass WebXR into this in the near future hence we call it the XR action map system in this document. It implements the built-in action map system of OpenXR mostly exactly as it is offered.
The XR action map system exposes input, positional data and output for XR controllers to your game/application. It does this by exposing named actions that can be tailored to your game/application and binding these to the actual inputs and outputs on your XR devices.
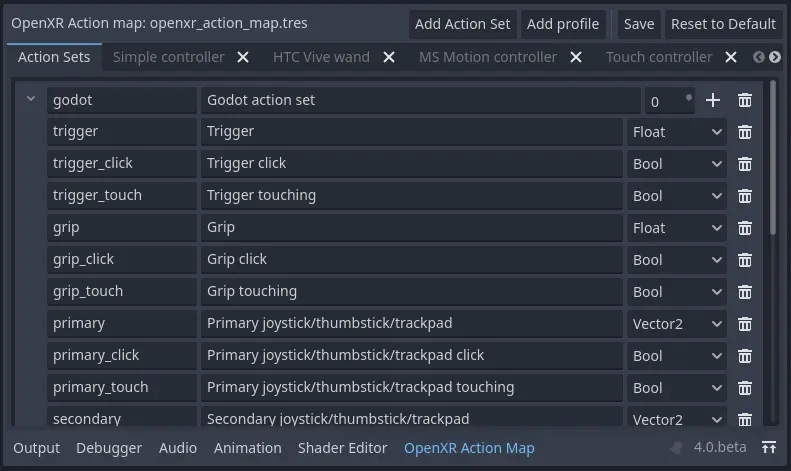
由于 XR 动作映射目前是 OpenXR 模块的一部分,因此需要在项目设置中启用 OpenXR 才能显示它:

然后,你会在屏幕底部看到 XR 行动地图界面:
备注
Godot's built-in input system has many things in common with the XR action map system. In fact our original idea was to add functionality to the existing input system and expose the data to the OpenXR action map system. We may revisit that idea at some point but as it turns out there were just too many problems to overcome. To name a few:
Godot's input system mainly centers around button inputs, XR adds triggers, axis, poses and haptics (output) into the mix. This would greatly complicate the input system with features that won't work for normal controllers or contrast with the current approach. It was felt this would lead to confusion for the majority of Godot users.
Godot's input system works with raw input data that is parsed and triggers emitting actions. This input data is made available to the end user. OpenXR completely hides raw data and does all the parsing for us, we only get access to already parsed action data. This inconsistency is likely to lead to bugs when an unsuspecting user tries to use an XR device as a normal input device.
Godot 的输入系统允许在运行时更改输入与操作的绑定,而 OpenXR 则不允许。
Godot 的输入系统基于设备 ID,而这在 OpenXR 中毫无意义。
这确实意味着混合了传统输入和 XR 控制器的游戏/应用将会有一个分离。对于大多数应用来说,要么使用一个,要么使用另一个,这不被视为问题。最后,这是系统的限制。
默认动作映射
如果找不到操作映射文件,Godot 会自动创建默认操作映射。
警告
This default map was designed to help developers port their XR games/applications from Godot 3 to Godot 4. As a result this map essentially binds all known inputs on all controllers supported by default, to actions one on one. This is not a good example of setting up an action map. It does allow a new developer to have a starting point when they want to become familiar with Godot XR. It prevents having to design a proper action map for their game/application first.
For this walkthrough we're going to start with a blank action map. You can delete the "Godot action set" entry at the top by pressing the trash can icon. This will clear out all actions. You might also want to remove the controllers that you do not wish to setup, more on this later.
动作集
备注
Before we dive in, you will see the term XR runtime used throughout this document. With XR runtime we mean the software that is controlling and interacting with the AR or VR headset. The XR runtime then exposes this to us through an API such as OpenXR. So:
对于 Steam,这是 SteamVR,
对于桌面上的 Meta,这是 Oculus 客户端(包括使用 Quest link 时),
对于 Quest 上的 Meta,这是 Quest 的本地 OpenXR 客户端,
在 Linux 上,这可能是 Monado 等。
行动地图允许我们组织我们的行动。每组都可以单独启用或禁用。
这里的概念是,在不同的场景中,可以有不同的集合来提供绑定。你可以:
a
Character controlset for when you're walking around,a
Vehicle controlset for when you're operating a vehicle,a
Menuset for when a menu is open.
Only the action set applicable to the current state of your game/application can then be enabled.
This is especially important if you wish to bind the same input on a controller to a different action. For instance:
in your
Character controlset you may have an actionJump,in your
Vehicle controlset you may have an actionAccelerate,in your
Menuset you may have an actionSelect.
All are bound to the trigger on your controller.
OpenXR will only bind an input or output to a single action. If the same input or output is bound to multiple actions the one in the active action set with the highest priority will be the one updated/used. So in our above example it will thus be important that only one action set is active.
对于你的第一个 XR 游戏/应用程序,我们强烈建议只从一个动作集开始,不要过度设计。
For our walkthrough in this document we will thus create a single action set
called my_first_action_set.
We do this by pressing the Add action set button:

The columns in our table are as follows:
Col |
值 |
描述 |
|---|---|---|
1 |
my_first_action_set |
这是动作集的内部名称。除了大小之外,OpenXR 没有对这个名称指定具体的限制,但是有些 XR 运行时不喜欢空格或特殊字符。 |
2 |
我的第一套动作 |
这是动作集的可读名称。一些 XR 运行时会向最终用户显示这个名称,例如在配置对话框中。 |
3 |
0 |
这是动作集的优先级。如果多个活动动作集具有绑定到相同控制器输入或输出的动作,则具有最高优先级值的动作集将确定被更新的动作。 |
动作
In the XR action map, actions are the entities that your game/application will
interact with.
For instance, we can define an action Shoot and the input bound to that action will
trigger the button_pressed signal on the relevant XRController3D
node in your scene with Shoot as the name parameter of the signal.
You can also poll the current state of an action.
XRController3D for instance has
an is_button_pressed method.
动作可以用于输入和输出,每个动作都有一个类型,用于指定其行为。
Bool类型用于离散输入,例如按键。Float类型用于模拟输入,例如触发器。
这两者的特别之处在于它们是唯一可以互换的动作。OpenXR 会处理 Bool 和 Float 输入或动作之间的转换。可以通过调用 XRController3D 节点上的方法 get_float 来获得一个 Float 类动作的值。此值更改的时候会发出 input_float_changed 信号。
备注
以按键查询模拟输入时会应用一个阈值。该阈值目前由 XR 运行时专门管理。未来有计划对 Godot 进行扩展,为这些阈值提供某种程度上的控制。
Vector2 类型将输入定义为轴输入。触摸屏,操纵杆等类似输入都以向量形式显示。可以通过在 XRController3D 节点上调用 get_vector2 方法来获取 Vector2 类动作的值。当发生更改时,它会发出 input_vector2_changed 信号。
The Pose type defines a spatially tracked input.
Multiple "pose" inputs are available in OpenXR: aim, grip and palm.
Your XRController3D node is automatically positioned based
on the pose action assigned to pose property of this node.
More about poses later.
备注
The OpenXR implementation in Godot also exposes a special pose called Skeleton.
This is part of the hand tracking implementation.
This pose is exposed through the skeleton action that is supported outside of the
action map system.
It is thus always present if hand tracking is supported.
You don't need to bind actions to this pose to use it.
Finally, the only output type is Haptic and it allows us to set the intensity of
haptic feedback, such as controller vibration.
Controllers can have multiple haptic outputs and support for haptic vests is coming
to OpenXR.
So lets add an action for our aim pose, we do this by clicking on the + button for
our action set:

The columns in our table are as follows:
Col |
值 |
描述 |
|---|---|---|
1 |
aim_pose |
这是该动作的内部名称。除大小外 OpenXR 不明确指定对该名称的任何限制,但某些 XR 运行时会排斥空格或特殊字符。 |
2 |
瞄准姿势 |
这是该动作的人类可读名称。某些 XR 运行时会将该名称显示给终端用户,例如在配置窗口中。 |
3 |
姿势 |
主题类型变种。 |
OpenXR 定义了许多控制器常用的可绑定输入姿态。对于不同的控制器支持哪些姿势,没有规则。OpenXR 目前定义的姿势有:
The aim pose on most controllers is positioned slightly in front of the controller and aims forward. This is a great pose to use for laser pointers or to align the muzzle of a weapon with.
The grip pose on most controllers is positioned where the grip button is placed on the controller. The orientation of this pose differs between controllers and can differ for the same controller on different XR runtimes.
The palm pose on most controllers is positioned in the center of the palm of the hand holding the controller. This is a new pose that is not available on all XR runtimes.
备注
如果使用手部跟踪,目前不同 XR 运行时之间的实现存在很大差异。因此,动作图目前不适合手部跟踪。这方面的工作正在进行中,敬请关注。
让我们完成一个非常简单的射击游戏/应用程序的动作列表:
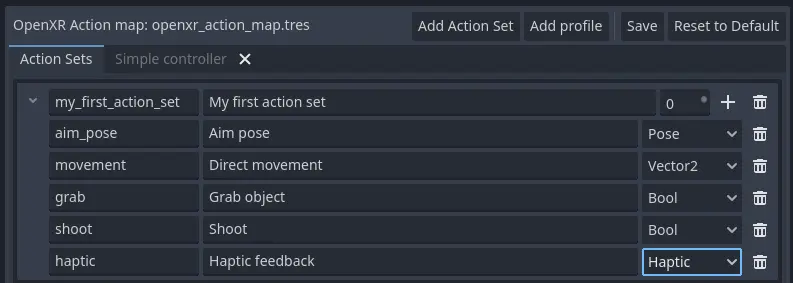
我们添加的操作有:
movement, which allows the user to move around outside of normal room scale tracking.
抓取,检测用户想要拿东西。
射击,它检测到用户想要发射他们持有的武器。
触觉,它允许我们输出触觉反馈。
Now note that we don't distinguish between the left and right hand. This is something that is determined at the next stage. We've implemented the action system in such a way that you can bind the same action to both hands. The appropriate XRController3D node will emit the signal.
警告
For both grab and shoot we've used the Bool type.
As mentioned before, OpenXR does automatic conversions from an analogue controls
however not all XR Runtimes currently apply sensible thresholds.
We recommend as a workaround to use the Float type when interacting with triggers
and grip buttons and apply your own threshold.
For buttons like A/B/X/Y and similar where there is no analogue option, the Bool
type works fine.
备注
You can bind the same action to multiple inputs for the same controller on the same profile. In this case the XR runtime will attempt to combine the inputs.
For
Boolinputs, this will perform anORoperation between the buttons.For
Floatinputs, this will take the highest value of the bound inputs.The behavior for
Poseinputs is undefined, but the first bound input is likely to be used.
You shouldn't bind multiple actions of the same action set to the same controller input. If you do this, or if actions are bound from multiple action sets but they have overlapping priorities, the behavior is undefined. The XR runtime may simply not accept your action map, or it may take this on a first come first serve basis.
我们仍在研究将多个动作绑定到同一个输出的限制,因为这种场景是有意义的。OpenXR 规范似乎不允许这样做。
既然我们已经定义了基本的动作,那么是时候把它们连接起来了。
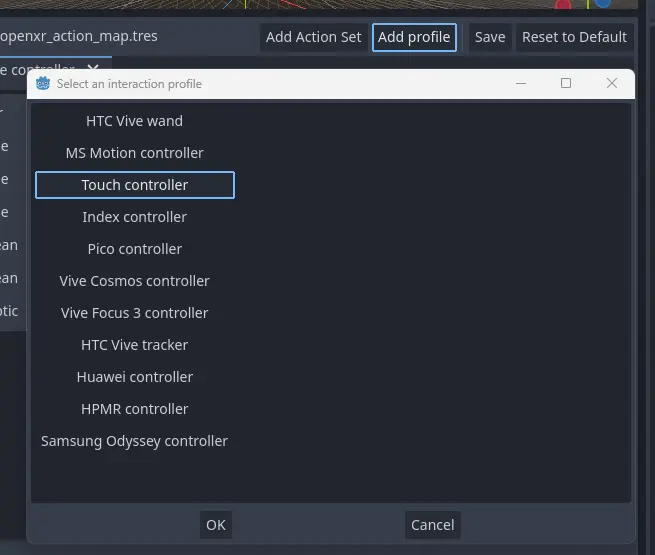
配置文件
In OpenXR controller bindings are captured in so-called "Interaction Profiles". We've shortened it to "Profiles" because it takes up less space.
选择这个通用名称是因为控制器不能覆盖整个系统。目前也有跟踪器、遥控器和跟踪笔的配置文件。对于跑步机、触觉背心等设备也有规定,尽管这些还不是规范的一部分。
警告
要知道 OpenXR 对支持的设备有严格的检查,这一点很重要。核心规范确定了许多控制器和类似设备及其支持的输入和输出。每个 XR 运行时都必须接受这些交互配置文件,即使它们不适用。
新设备是通过扩展添加的,XR 运行时必须指定它们支持哪些设备。不支持通过扩展添加的设备的 XR 运行时将不接受这些配置文件。不支持添加的输入或输出类型的 XR 运行时通常会崩溃。
As such Godot keeps meta data of all available devices, their inputs and outputs and which extension adds support for them. You can create interaction profiles for all devices you wish to support. Godot will filter out those not supported by the XR runtime the user is using.
这意味着为了支持新的设备,你可能需要升级到最新版本的Godot。
It is however also important to note that the action map has been designed with this in mind. When new devices enter the market, or when your users use devices that you do not have access to, the action map system relies on the XR runtime. It is the XR runtime's job to choose the best fitting interaction profile that has been specified and adapt it for the controller the user is using.
XR 运行时如何做到这一点取决于运行时的实现,因此运行时之间有很大的差异。一些运行时甚至允许用户自己编辑绑定。
A common approach for a runtime is to look for a matching interaction profile first. If this is not found it will check the most common profiles such as that of the "Touch controller" and do a conversion. If all else fails, it will check the generic "Simple controller".
备注
There is an important conclusion to be made here: When a controller is found, and the action map is applied to it, the XR runtime is not limited to the exact configurations you set up in Godot's action map editor. While the runtime will generally choose a suitable mapping based on one of the bindings you set up in the action map, it can deviate from it.
例如,当使用触摸控制器配置文件时,以下任何一种情况都可能发生:
we could be using a Quest 1 controller,
we could be using a Quest 2 controller,
我们可以使用 Quest Pro 控制器,但没有提供 Quest Pro 配置文件,或者使用的 XR 运行时不支持 Quest Pro 控制器,
它可能是一个完全不同的控制器,没有给出配置文件,但是 XR 运行时使用触摸绑定作为基础。
因此,目前没有办法确切地知道用户实际使用的是哪个控制器。
警告
最后,这让很多人犯了错误,绑定并不是一成不变的。XR 运行时允许用户定制绑定是完全允许的,甚至是可以预期的。
目前,没有一个 XR 运行时提供这种功能,尽管 SteamVR 有一个来自 OpenVRs action map system 的现有 UI ,仍然可以访问。不过,这方面的工作正在积极进行中。
第一个控制器绑定
让我们以触摸控制器为例,设置我们的第一个控制器绑定。
Press "Add profile", find the Touch controller, and add it. If it is not in the list, then it may already have been added.
Our UI now shows panels for both the left and right controllers.
The panels contain all of the possible inputs and outputs for each controller.
We can use the + next to each entry to bind it to an action:

引擎配置:
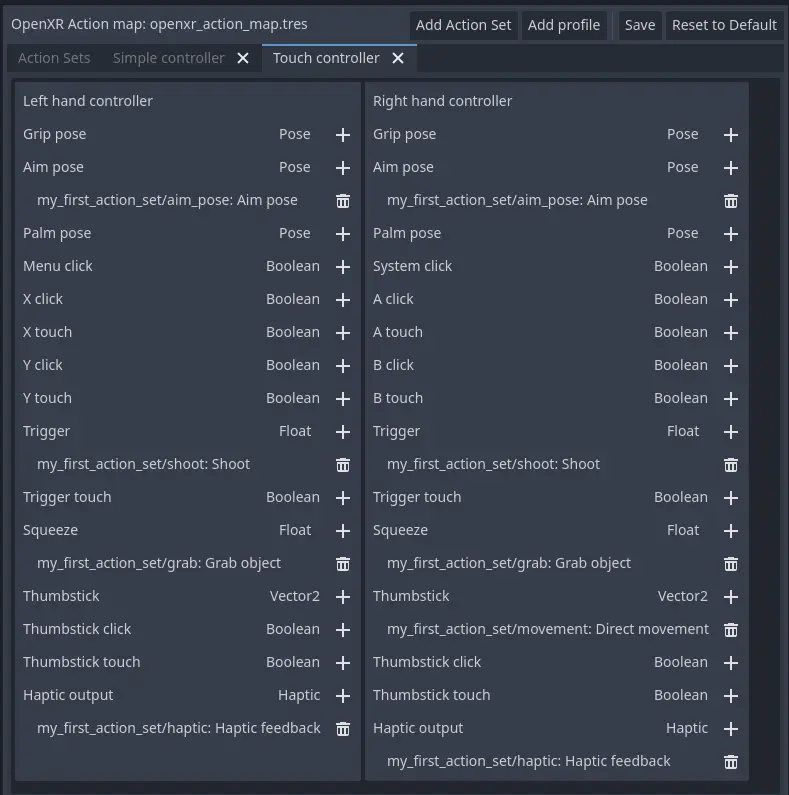
Each action is bound the given input or output for both controllers to indicate that we support the action on either controller. The exception is the movement action which is bound only to the right hand controller. It is likely that we would want to use the left hand thumbstick for a different purpose, say a teleport function.
In developing your game/application you have to account for the possibility that the user changes the binding and binds the movement to the left hand thumbstick.
Also note that our shoot and grab boolean actions are linked to inputs of type Float.
As mentioned before OpenXR will do conversions between the two, but do read the warning
given on that subject earlier in this document.
备注
Some of the inputs seem to appear in our list multiple times.
For instance we can find the X button twice, once as X click and then
as X touch.
This is due to the Touch controller having a capacitive sensor.
X touchwill be true if the user is merely touching the X button.X clickwill be true when the user is actually pressing down on the button.
Similarly for the thumbstick we have:
Thumbstick touchwhich will be true if the user is touching the thumbstick.Thumbstickwhich gives a value for the direction the thumbstick is pushed to.Thumbstick clickwhich is true when the user is pressing down on the thumbstick.
It is important to note that only a select number of XR controllers support touch sensors or have click features on thumbsticks. Keep that in mind when designing your game/application. Make sure these are used for optional features of your game/application.
简单控制器
The "Simple controller" is a generic controller that OpenXR offers as a fallback. We'll apply our mapping:
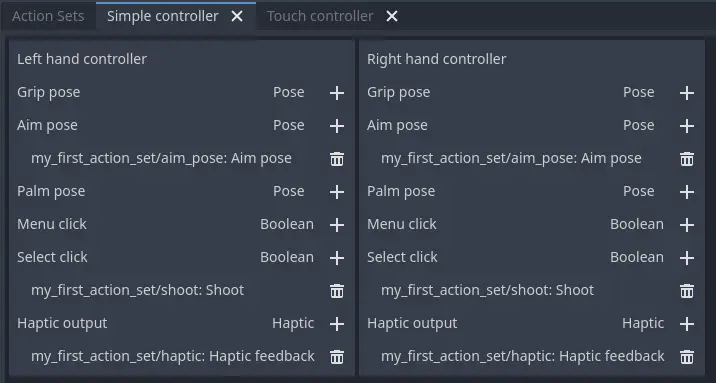
As becomes painfully clear, the simple controller is often far too simple and falls short for anything but the simplest of VR games/applications.
This is why many XR runtimes only use it as a last resort and will attempt to use bindings from one of the more popular systems as a fallback first.
备注
Due to the simple controller likely not covering the needs of your game, it is tempting to provide bindings for every controller supported by OpenXR. The default action map seems to suggest this as a valid course of action. As mentioned before, the default action map was designed for ease of migration from Godot 3.
It is the recommendation from the OpenXR Working Group that only bindings for controllers actually tested by the developer are setup. The XR runtimes are designed with this in mind. They can perform a better job of rebinding a provided binding than a developer can make educated guesses. Especially as the developer can't test if this leads to a comfortable experience for the end user.
This is our advice as well: limit your action map to the interaction profiles for devices you have actually tested your game with. The Oculus Touch controller is widely used as a fallback controller by many runtimes. If you are able to test your game using a Meta Rift or Quest and add this profile there is a high probability your game will work with other headsets.
Binding Modifiers
One of the main goals of the action map is to remove the need for the application to know the hardware used. However, sometimes the hardware has physical differences that require inputs to be altered in ways other than how they are bound to actions. This need ranges from setting thresholds, to altering the inputs available on a controller.
Binding modifiers are not enabled by default and require enabling in the OpenXR project settings. Also there is no guarantee that these modifiers are supported by every runtime. You will need to consult the support for the runtimes you are targeting and decide whether to rely on the modifiers or implement some form of fallback mechanism.
If you are targeting multiple runtimes that have support for the same controllers, you may need to create separate action maps for each runtime. You can control which action map Godot uses by using different export templates for each runtime and using a custom feature tag to set the action map.
In Godot, binding modifiers are divided into two groups: modifiers that work on the interaction profile level, and modifiers that work on individual bindings.
Binding modifiers on an interaction profile
Binding modifiers that are applied to the whole interaction profile can be accessed through the modifier button on the right side of the interaction profile editor.
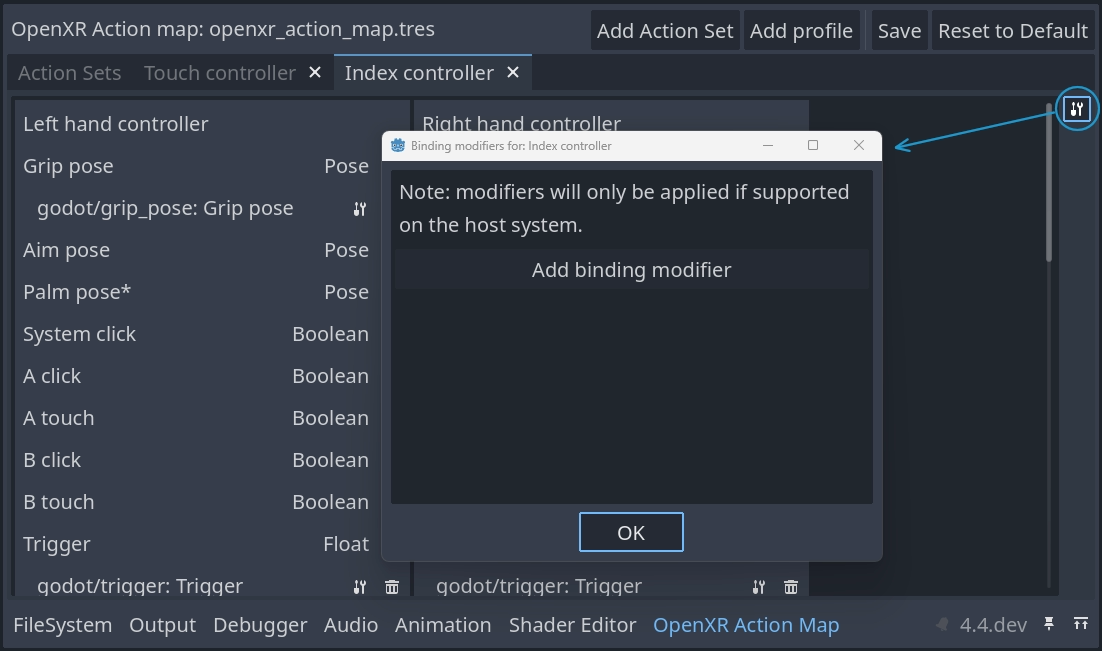
You can add a new modifier by pressing the Add binding modifier button.
警告
As Godot doesn't know which controllers and runtimes support a modifier, there is no restriction to adding modifiers. Unsupported modifiers will be ignored.
Dpad Binding modifier
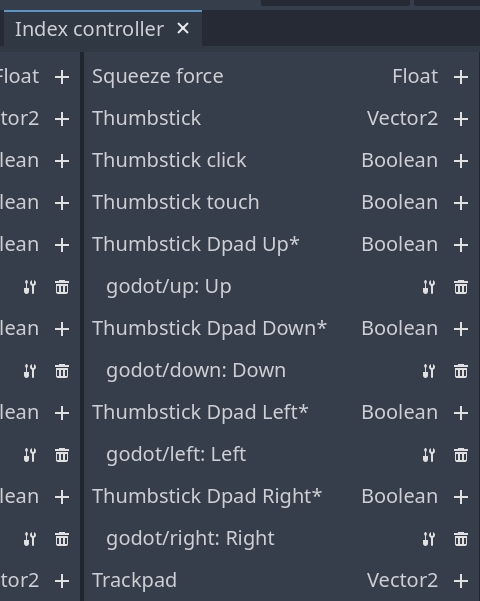
The dpad binding modifier adds new inputs to an interaction profile for each joystick and thumbpad input on this controller. It turns the input into a dpad with separate up, down, left and right inputs that are exposed as buttons:
备注
Inputs related to extensions are denoted with an asterix.
In order to use the dpad binding modifier you need to enable the dpad binding modifier extension in project settings:
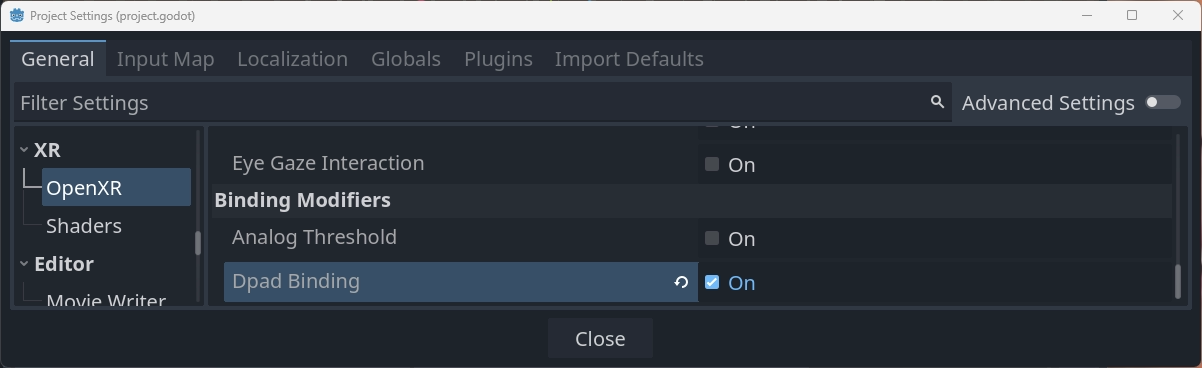
Enabling the extension is enough to make this functionality work using default settings.
Adding the modifier is optional and allows you to fine tune the way the dpad functionality behaves. You can add the modifier multiple times to set different settings for different inputs.
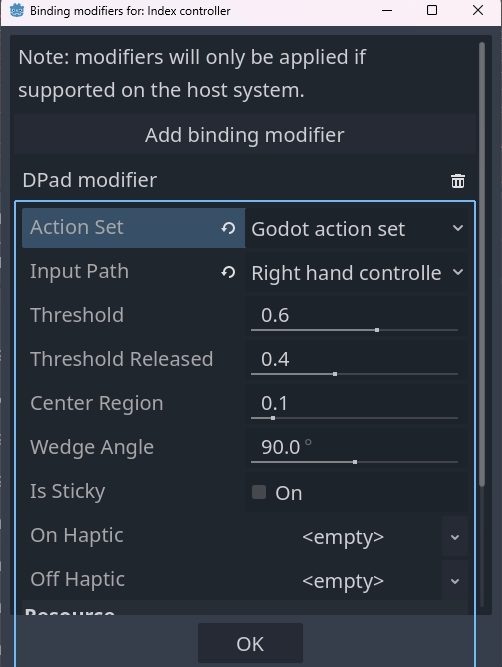
These settings are used as follows:
Action Setdefines the action set to which these settings are applied.
Input Pathdefines the original input that is mapped to the new dpad inputs.
Thresholdspecifies the threshold value that will enable a dpad action, e.g. a value of0.6means that if the distance from center goes above0.6the dpad action is pressed.
Threshold Releasedspecifies the threshold value that will disable a dpad action, e.g. a value of0.4means that if the distance from center goes below0.4the dpad action is released.
Center Regionspecifies the distance from center that enabled the center action, this is only supported for trackpads.
Wedge Anglespecifies the angle of each wedge. A value of90 degreesor lower means that up, down, left and right each have a separate slice in which they are in the pressed state. A value above90 degreesmeans that the slices overlap and that multiple actions can be in the pressed state.
Is Sticky, when enabled means that an action stays in the pressed state until the thumbstick or trackpad moves into another wedge even if it has left the wedge for that action.
On Hapticlets us define a haptic output that is automatically activated when an action becomes pressed.
Off Hapticlets us define a haptic output that is automatically activated when a action is released.
Binding modifiers on individual bindings
Binding modifiers that are applied to individual bindings can be accessed through the binding modifier button next to action attached to an input:
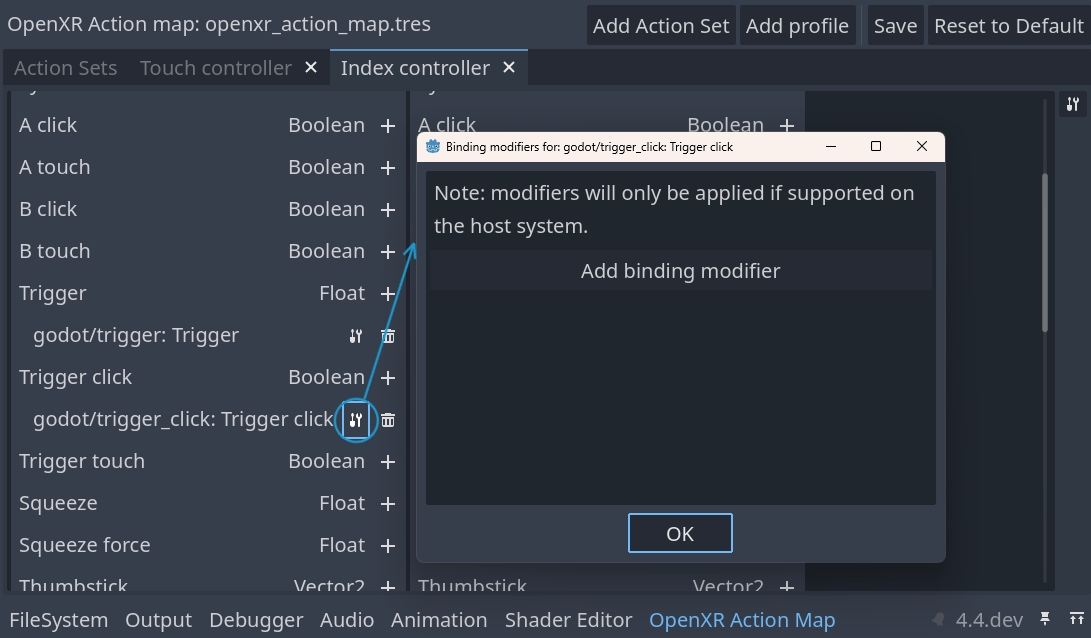
You can add a new modifier by pressing the Add binding modifier button.
警告
As Godot doesn't know which inputs on each runtime support a modifier, there is no restriction to adding modifiers. If the modifier extension is unsupported, modifiers will be filtered out at runtime. Modifiers added to the wrong input may result in a runtime error.
You should test your action map on the actual hardware and runtime to verify the proper setup.
Analog threshold modifier
The analog threshold modifier allows you to specify the thresholds used for any analog input, like the trigger, that has a boolean input. This controls when the input is in the pressed state.
In order to use this modifier you must enable the analog threshold extension in the project settings:

The analog threshold modifier has the following settings:

These are defined as follows:
On Thresholdspecifies the threshold value that will enable the action, e.g. a value of0.6means that when the analog value gets above0.6the action is set to the pressed state.
Off Thresholdspecifies the threshold value that will disable the action, e.g. a value of0.4means that when the analog value goes below0.4the action is set in to the released state.
On Hapticlets us define a haptic output that is automatically activated when the input is pressed.
Off Hapticlets us define a haptic output that is automatically activated when the input is released.
Haptics on modifiers
Modifiers can support automatic haptic output that is triggered when thresholds are reached.
备注
Currently both available modifiers support this feature however there is no rule future modifiers also have this capability. Only one type of haptic feedback is supported but in the future other options may become available.
Haptic vibration
The haptic vibration allows us to specify a simple haptic pulse:
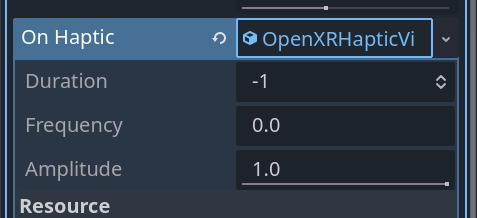
It has the following options:
Durationis the duration of the pulse in nanoseconds.-1lets the runtime choose an optimal value for a short pulse suitable for the current hardware.
Frequencyis the frequency of the pulse in Hz.0lets the runtime choose an optimal frequency for a short pulse suitable for the current hardware.
Amplitudeis the amplitude of the pulse.